Pinecone Christmas Tree Craft for Kids: 13 Creative Ideas and Tips For Making Mini Christmas Trees
Last Updated on October 28, 2026 by Duncan
A pinecone Christmas tree craft for kids is one of those holiday projects that looks charming on a mantel, makes a thoughtful handmade gift, and gives little hands something fun to do on a chilly afternoon.
The secret to a successful pinecone Christmas tree craft is choosing the right pinecone, using decorations that fit between its scales, and making sure the finished tree can stand without toppling over every time someone walks past the table.
If you are planning a Christmas craft afternoon at home, these ideas will help you create miniature trees that look festive without requiring expensive supplies or perfect crafting skills.
Use pom poms for colorful ornaments

Pom poms are the easiest ornaments you can hand a small child. They are soft, light, and forgiving when they land in the wrong spot.
Use tiny ones, about a quarter inch. Big pom poms swallow the tree. And you don’t want this.
Put a dot of tacky glue on the pom pom and press it between two scales. The scales hold it in place while the glue sets.
When one falls off, nothing breaks and nobody cries.
Use buttons for a vintage Christmas look

Dig through your sewing tin or grandma’s button jar. Old red, green and cream buttons make a tree look like it came from a farmhouse attic.
Pick flat buttons with two or four holes. Buttons with a loop on the back stick out and wobble. This is not good.
Glue them near the tips of the scales and keep the sizes small.
Make mini Christmas trees with beads

Beads give you sparkle with no glitter cleanup. They are also a swallowing hazard, so save this one for ages five and up.
Glue single beads to the scale tips, or thread a few onto a short piece of craft wire and curl it into a tiny garland.
Stick to two colors. Red and gold, or silver and blue. They look fancy. Avoid many colors as they make your Christmas tree look like a gumball machine.
Work over a tray to prevent the beads from rolling over.
Turn felt scraps into tiny Christmas decorations

Felt does not fray, and kids can cut it without much trouble. That makes it the best scrap bin material for this craft.
Cut little stars, hearts and circles about the size of a thumbnail then tuck them between scales or glue one on top.
A hole punch gives you perfect tiny circles that look like ornaments. Save the leftover felt in a zip bag for next year’s craft project.
Make a pinecone Christmas tree with paper stars

A star on top finishes the tree. It also hides the messy spot where the top cones meet.
Glue two paper stars back to back with a toothpick sandwiched between them. As a grown up you should push the toothpick into the top of the cone base.
Use gold cardstock instead of thin printer paper as thin paper curls the second the glue touches it.
Wrap the tree with a tiny garland

Garland makes the tree look finished. It also covers the gaps between rows.
Use baker’s twine or a thin strip of ribbon. Start at the top, tuck the end under the star, and spiral down.
Glue it every few inches. Skip that, and the garland slides to the bottom by morning.
Wrap loosely so the scales still show. A tight wrap makes the tree look tied up for shipping.
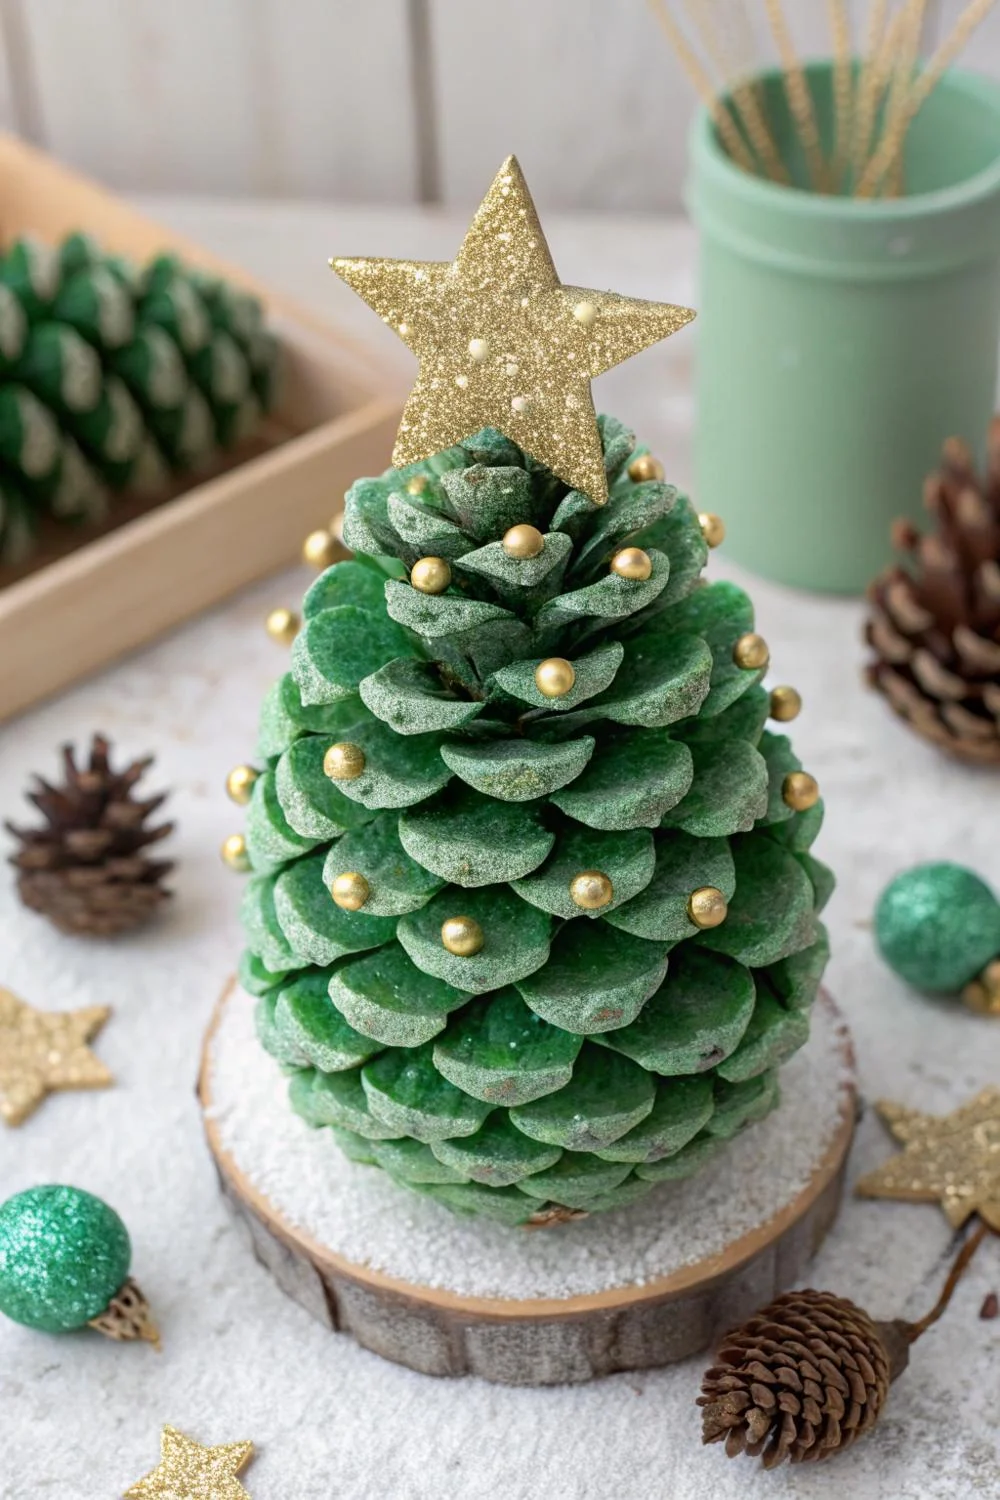
Make classic green pinecone Christmas trees

Green paint is the move if you want it to read as a tree from across the room.
Dab acrylic paint on the scale tips. You get depth that a flat coat never gives.
Choose forest green, not bright kelly green. Kelly green looks like a lawn game.
Let the first coat dry before you add a second. Wet on wet gets muddy fast.
And you don’t want this, do you?
Decorate pinecone trees with washable paint and cotton buds

Cotton buds are tiny paintbrushes that small hands can hold. Dip one in paint and dab dots onto the scale tips for instant ornaments.
Washable paint matters here. It wipes off the table, the sleeve and the dog.
Use one bud per color so the blues stay blue. They cost almost nothing, so toss them as you go.
Make rainbow pinecone trees for creative kids

Some kids will never want a green tree, and that is fine.
Paint each row a different color, starting with red at the bottom. By the top you have a tree that looks like a rainbow cake.
Paint the cones before you glue them on. Painting between scales on a finished tree is slow work and easy to get wrong.
Create a natural woodland pinecone tree

No paint, no glitter. Just cones, acorn caps, twigs and a pinch of dried moss.
Glue acorn caps among the scales as ornaments, and tuck moss around the base to hide the glue. It looks like a tiny forest floor.
Make a miniature Christmas tree village

One tree is cute. Five trees in different sizes look like a tiny forest.
Make small, medium and large trees, then set them on a white tray with cotton batting for snow. Group them in odd numbers, three or five.
Add a few little houses cut from cardboard and you have a village. Keep it on the mantel, because a coffee table village meets the dog by lunchtime.
Tips for Making the Best Christmas Tree Decorations
Pick your cone base before you pick your pinecones

The pinecones are the pretty part, but the base decides whether the tree stands.
A foam cone is easy for kids because glue grabs it fast. A cardboard cone from a craft store works too, and it is lighter for tiny hands.
A rolled paper cone is the cheapest option. It is also the wobbliest, so save it for kids who can handle a gentle touch.
My pick for most families is foam. It forgives crooked gluing and still looks good.
Choose pinecones with open scales for easier decorating

Open scales give you little shelves for glue dabs, beads and paint.
A tightly closed cone gives you nothing to grip.
For an easy time look for cones that flare out like an open hand.
Hold one up before you commit. If the tip looks like a fist, it goes back in the basket for the oven.
Small larch cones are worth saving for mini trees. They open wide even when they look too tiny to bother with.
Give it a full day before anyone plays with it
Tacky glue feels set after ten minutes. It is not.
Let the trees sit for at least a day. Move them as little as possible, and resist the urge to show them off immediately.
If you are gifting them, give them to Grandma on day two. A tree that sheds in the car is a sad thing.
A light mist of clear spray sealer on the finished tree helps keep scales in place. Do this outside, and keep it a grown up job.
Match the glue to the age

A hot glue gun is the fastest option and the one that gives kids a fingertip blister.
For ages seven and under, use tacky glue or glue dots. It is slower, but nobody cries.
For older kids, a low temp glue gun is fine with an adult sitting right beside them. Keep a bowl of cold water nearby just in case.
With tacky glue, expect each cone to need a minute of holding. Plan a snack break, because the first row is the slow one.
Start at the bottom and work in rows

It feels backwards, but gluing the bottom row first gives you a straight line to build from.
Tilt each pinecone so the tip points down and out, like branches. Overlap each row slightly so no foam shows through.
The first time I let kids start at the top, we ended up with pinecones sliding down the cone like tiny avalanches.
Bottom first, every time.
Cut the stem ends flat

Every pinecone has a stubby, uneven stem. That bumpy end is what keeps cones from sitting snug against the base.
Trim it with garden clippers, or a strong pair of scissors if you are using small cones. This is a grown up job.
One flat cut and the cone glues on like it was made for the spot.
Decorate with fewer things

Kids love to add everything. Beads, pom poms, buttons, sequins, and three different colors of ribbon.
Then you end up with a pinecone tree that looks like a craft drawer exploded.
Pick two decoration types and a star. Red pom poms and gold beads, for example, look sweet and look good in photos.
If your child insists on more, give them a second tree. Problem solved, and now you have a matching set.
Related Posts: