Wondering What to Do With Tree Stump In Front Yard? 11 Amazing Ideas to Try Out
Last Updated on May 27, 2026 by Duncan
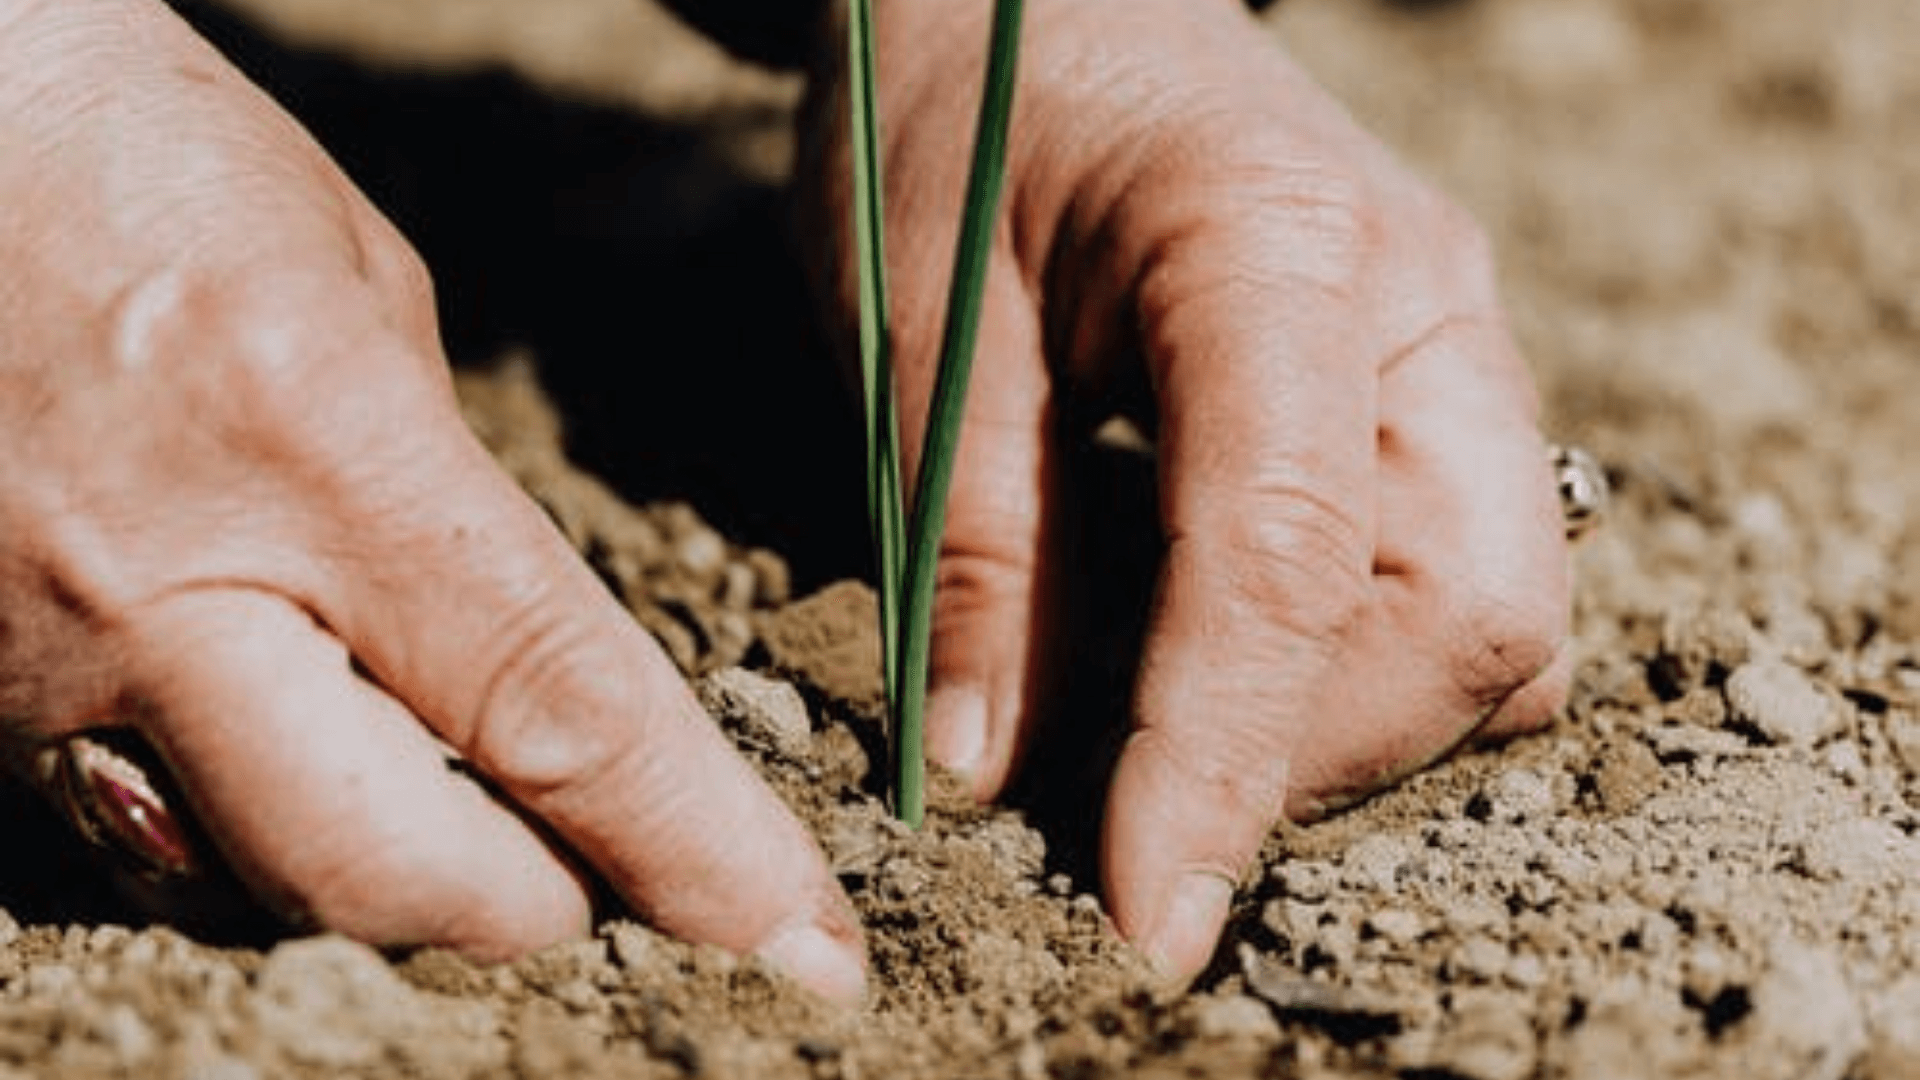
After cutting down a large oak in my front yard three years ago, I was left staring at an ugly, knee-high stump for weeks — and I had absolutely no idea what to do with it.
My first instinct was to call someone and have it ground down immediately. But then I started experimenting, and what I ended up with became the most-talked-about feature on my block.
If you’re in the same situation, don’t rush to remove it. A tree stump in the front yard can be an eyesore, yes — but it can also become something truly special with a little creativity.
Below are 11 proven ideas for what to do with a tree stump in your front yard, including what actually worked for me.
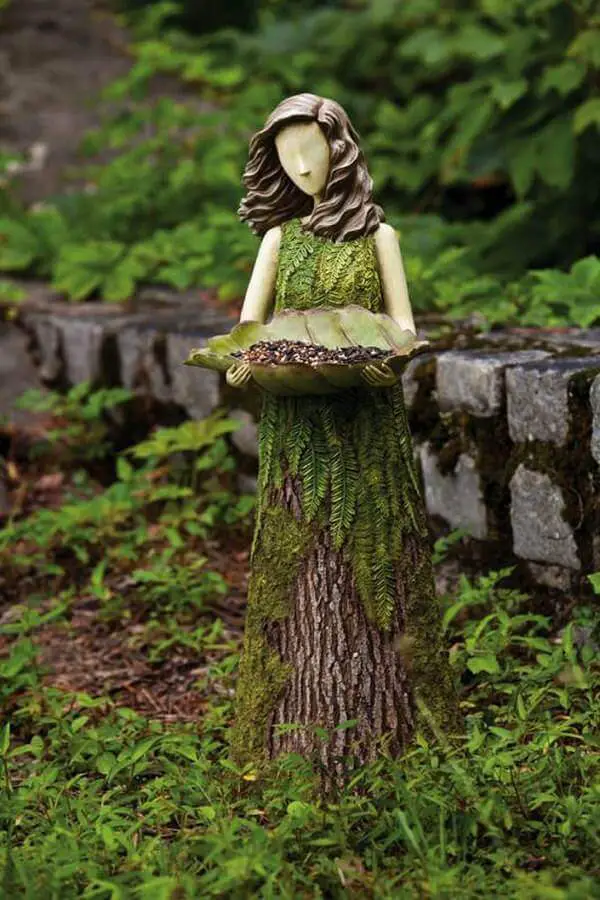
1. Welcome Fairies Into Your Front Yard
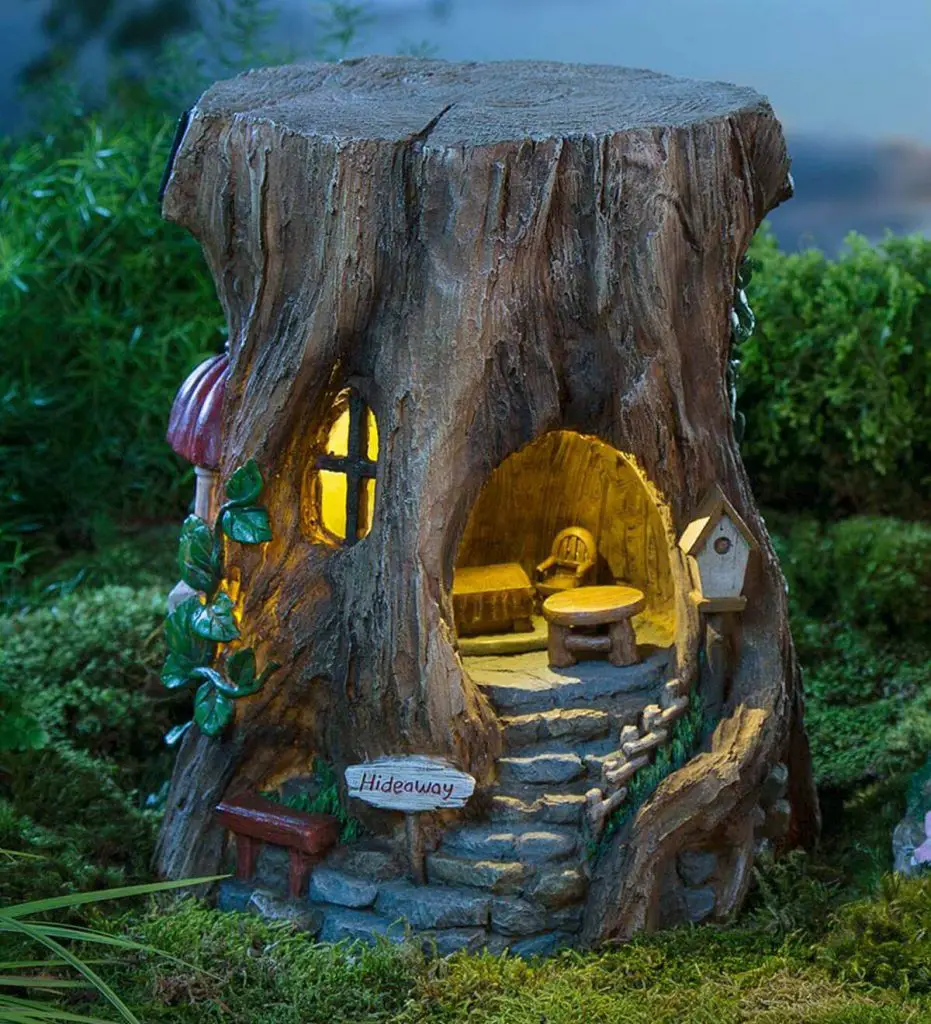
If you have a large stump, one of the most enchanting things you can do is transform it into a fairy or gnome home.
I tried this with a neighbor’s kids one weekend, and it took just an afternoon — no power tools required. The result was something the whole neighborhood stopped to admire.
Start by adding a small door and a couple of windows to the stump. You can craft these from twigs, mirrored glass pieces, or even thin slices of bark.
Add a miniature path leading up to the door using acorns, pebbles, or gravel, and create a tiny patio with a flat rock at the entrance.
For an extra magical touch, plant mosses, ajuga, or other low-growing ground covers around the base.
Then populate the home with small fairy figurines, and if you have children, move the fairies around periodically to create evolving little storylines. Trust me — kids go absolutely wild for this.
Pro tip: A winding staircase carved from bark scraps spiraling up the stump adds tremendous character with very little effort.
2. Create a Stunning Stump Planter

This was the first thing I personally tried — and it’s still my favorite result. A hollow stump planter turns what used to be dead wood into a living, blooming focal point that changes with the seasons.
To create one, hollow out the top of the stump using a chisel, mattock, or a drill with a large spade bit.
Aim for at least 2–3 inches of wood around the perimeter so the stump stays structurally sound. Importantly, drill a few drainage holes in the bottom so water doesn’t pool and cause root rot.
Once hollowed, you have two planting options: plant directly into the stump hole (add a layer of compost or potting soil first), or drop a container pot into the hole for easier seasonal swapping.
In my case, I planted a mix of trailing petunias and lobelia, and the effect was stunning — a cascade of purple and white flowers spilling over weathered wood.
If you live in a dry climate, succulents are a drought-tolerant alternative that look equally beautiful. Just make sure whatever you choose is suited for your local environment.
3. Turn It Into a Rustic Outdoor Table

A thick, solid stump is the perfect base for a natural outdoor side table — and this is one of the more functional transformations on this list.
I’ve seen homeowners use stump tables for morning coffee, as display stands for potted plants, or even as a spot for citronella candles on summer evenings.
Start by making the cut surface as flat and level as possible. If the stump is wide enough, you can chainsaw it at two different heights to create a two-tiered table effect — handy for drinks and snacks simultaneously.
For the tabletop, use a wood species that handles moisture well: cedar, redwood, and teak are all excellent outdoor choices that age gracefully without paint.
If you do want to paint or stain the surface, apply a quality exterior primer first, followed by two or more coats of semi-gloss wood paint. Let each coat dry completely before adding the next.
Secure the tabletop by drilling pilot holes and using galvanized wood screws. If the stump isn’t perfectly level, use wood shims or wedges underneath to correct the angle before fastening.
4. Paint a Board Game on Top
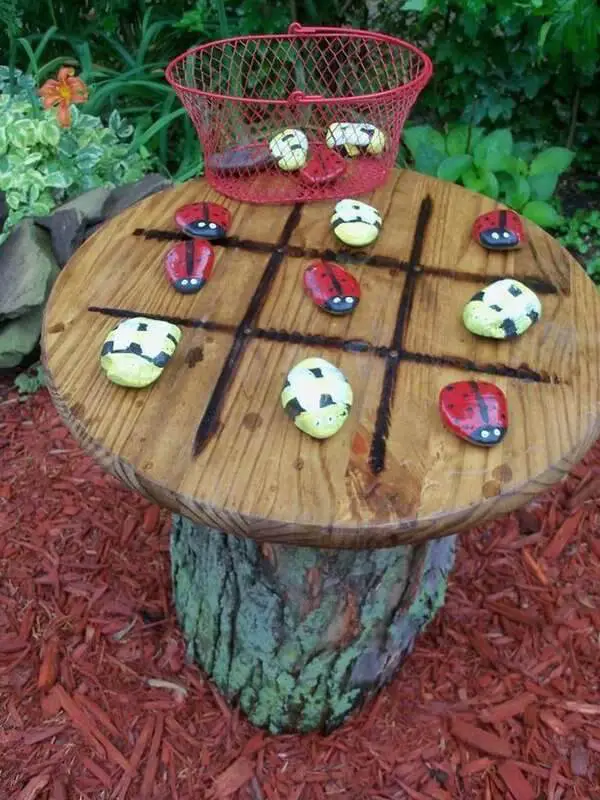
This idea is pure fun and works especially well if you have children. A flat-topped stump is an ideal canvas for a tic-tac-toe or checkerboard game that lives permanently in the yard.
First, make the surface as smooth as possible — sand it down if needed. Then paint your game grid directly onto the top with exterior-grade paint.
Collect smooth, palm-sized garden stones as game pieces and paint them in two contrasting colors or designs. Some popular themes I’ve seen: bumblebees vs. ladybugs, blue stars vs. red stripes, or classic X’s and O’s.
Once the paint dries, seal the entire top with a coat of exterior polyurethane or deck sealer to protect the artwork from rain and sun. Pull up a couple of lawn chairs, and you’ve got an instant outdoor game station.
5. Build a Bird Bath Into the Stump
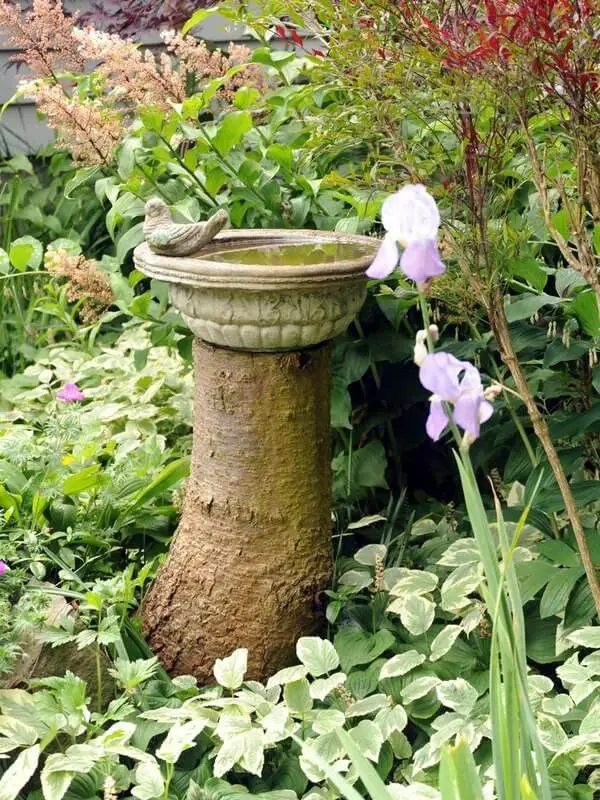
I’m a bird watcher, so this one immediately caught my eye when I first started researching stump ideas. A stump bird bath is functional, beautiful, and surprisingly simple to build — and once you fill it, birds will find it within days.
Before you begin, think through what birds actually need: a safe location away from predator hiding spots, shallow water (no more than 2 inches deep), a rough bottom for footing, and a nearby perch for scanning the surroundings.
Start by cleaning the stump thoroughly with a hose to remove dirt, debris, and any surface fungus. Then use a chisel, hammer, and drill to hollow out a shallow bowl shape in the top.
Mix a small batch of concrete, pour it into the depression, and use a trowel to smooth it into a seamless bowl shape — covering the bottom and sides fully. Let it cure for at least 24 hours before filling it with fresh water.
I placed mine under a tree branch so birds would have an easy landing perch overhead. Within a week, I had house sparrows, sunbirds, and a pair of doves stopping by regularly. Refresh the water every two to three days to keep it clean.
6. Commission (or Carve) a Sculpture
In the right hands, a chainsaw turns a dead stump into a genuine work of art. I’ve seen stumps transformed into owls, bears, human faces, and abstract shapes that make the front yard feel like an open-air gallery.
If you have chainsaw carving skills, you can tackle this yourself — soft maple carves particularly well, but most species respond to skilled carving. If you don’t, hire a local chainsaw artist.
Many towns have artisans who specialize in exactly this, and a custom stump sculpture is a one-of-a-kind piece that will outlast almost any other yard feature.
Search “chainsaw stump carver near me” to find someone local, and ask to see their portfolio before committing. Prices vary widely depending on complexity and stump size.
7. Install Stump Lamps for Atmospheric Lighting
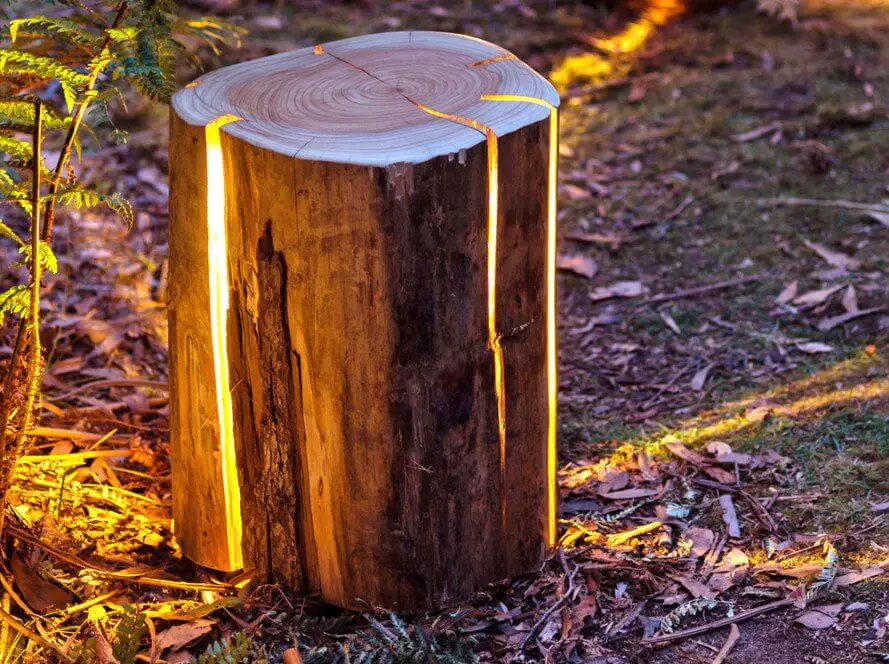
This idea was originally brought to life by Duncan Meerding, a legally blind Tasmanian furniture designer who transformed an ordinary tree stump into a beautiful weather-resistant lamp that doubles as a table and stool.
His genius was using the stump’s natural cracks as channels for LED light strips — the light seeps through the organic lines of the wood in a way that’s simply stunning at night.
You can recreate this on your own stump by identifying the natural cracks and fissures in the wood, then pressing LED strip lights into them.
Connect them to a weatherproof outdoor power source or a solar-powered unit for a completely off-grid solution. Choose warm white LEDs for a cozy, lantern-like glow, or go with color-changing LEDs if you want flexibility.
I added a small LED strip to the cracks of my stump and ran it through a simple outdoor timer. Guests often think it’s a piece of custom-purchased garden art — they’re always surprised when I tell them I made it myself in an afternoon.
8. Lay Stump Slices as a Walkway
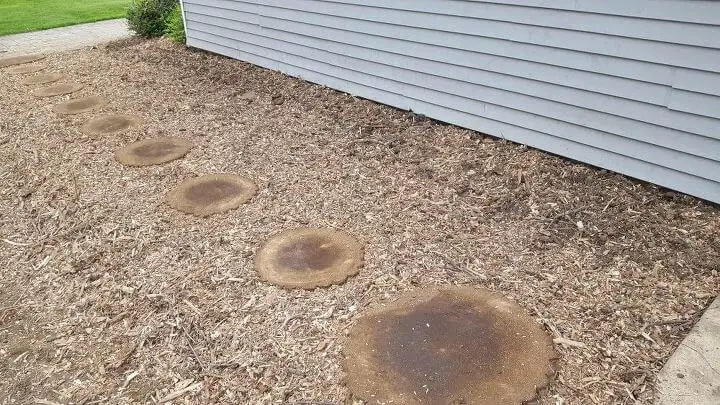
Image credit: hometalk.com
Standard concrete pavers are fine, but if you want a front yard path with real character, slicing your stump into wooden discs and using them as stepping stones is a beautiful, natural alternative.
Start by preparing the pathway area — for longer paths, rent a tiller; for short ones, a shovel works fine. To extend the life of the wood slices, dig down 3–4 inches and fill the base with compacted stone so water drains away from the discs rather than sitting under them.
Using a chainsaw or circular saw, cut the stump into discs about 2–4 inches thick. To protect them from water, insects, and rot, treat each disc with linseed oil.
First sand the surfaces with 120-grit sandpaper, then apply the first coat of linseed oil mixed with a mild solvent (like odorless thinner or citrus solvent) for better penetration.
Three coats total provides maximum protection; finish with a light hand polish for a smooth satin surface.
Lay the discs along your path, spaced at a walking-comfortable distance, and level each one with concrete.
For the longest-lasting results, use discs from hardwoods like walnut or ash rather than softer species.
If you don’t have a saw, most equipment rental shops will have one — or hire an arborist to cut the discs and a landscaping contractor to lay them.
9. Build a Natural Playground for Kids
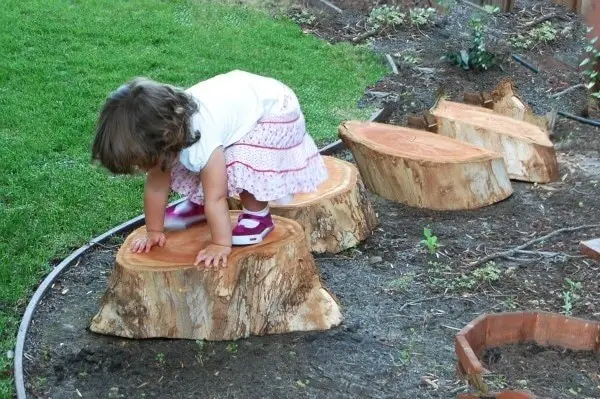
Children are natural climbers and jumpers — give them a reason to stay in the yard. A collection of stumps at varying heights creates an engaging, open-ended natural playground that’s far more interesting (and cheaper) than most commercial play equipment.
Source stumps of different heights and diameters — some from your own tree, others from neighbors or local tree services. Arrange them in a cluster under a large shade tree if possible. Kids will hop between them, balance across them, and invent their own games for hours.
A few important safety and maintenance notes from experience: sand down any sharp edges before kids use them, treat the wood to deter insect infestation, and inspect the stumps seasonally for signs of rot or structural weakness. A wobbly stump should be removed or secured before kids play on it again.
10. Grow Moss for a Lush, Ancient Look
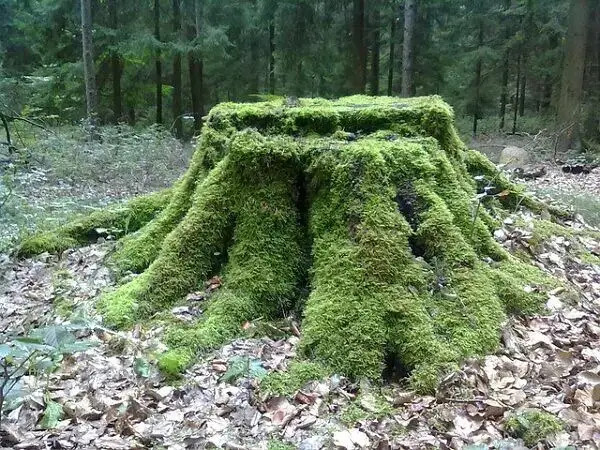
Moss has been growing on fallen wood since long before humans started worrying about landscaping — and there’s a reason it looks so naturally beautiful.
A moss-covered stump has an aged, woodland quality that few other yard features can match. As noted by Mr. Tree Services, mosses aren’t parasitic — they don’t damage the bark or exposed wood, making them safe to encourage on your stump.
Moss thrives on stumps in shaded, humid areas. If your stump gets full afternoon sun, this may not be the best choice — but for a north-facing yard or shaded corner, it’s perfect.
Pick up moss starter pads from a local plant nursery, attach them to the stump with wet clay or mud, and keep the surface moist until the moss establishes itself.
This is also one of the most reversible ideas on this list. If you ever change your mind, moss lifts off in thick mats — use work gloves to peel it away, or a power washer for larger stumps. If using a power washer, wear eye protection and stand at least five feet back to avoid damaging the wood.
11. Paint the Stump as a Canvas
If you have an artistic streak — or even if you don’t — a painted stump is a low-commitment, high-impact yard feature. The stump’s natural texture and circular rings make it a surprisingly interesting surface to work on.
You don’t need to create a masterpiece. Geometric patterns, bold colors, or designs that complement your home’s exterior palette all work beautifully.
For a more intricate finish, consider the mosaic technique — using broken tile or glass pieces set into exterior grout to create a colorful, durable, and truly unique stump feature.
Use exterior-grade acrylic paint for any painted designs, and seal with a UV-resistant outdoor topcoat to prevent fading through the seasons.
Unlike most other projects on this list, this one can be updated easily — repaint it each year if you like.
What If None of These Ideas Appeal to You?
Sometimes a stump is just a stump — and that’s okay too. If you’d rather start fresh, hire a professional tree service to grind it down and remove the debris.
Once the stump is gone, you have a blank slate: plant a new tree in its place, lay fresh turf, build a garden bed, or install a feature you’ve always wanted.
If you’re replacing the tree, opt for a fast-growing species that fits your climate. It’s also a wonderful opportunity to introduce variety — if the old tree was an oak, try a flowering cherry or apple for color and seasonal interest. You might find you’re grateful the old one came down.
The new look of your yard may surprise you. Sometimes removing a tired old tree — and thoughtfully replacing it — opens up the space in ways you never expected.
Final Thoughts
A tree stump doesn’t have to be a problem you solve by throwing money at a removal company.
From fairy homes and bird baths to sculpture and living planters, there are creative, affordable, and genuinely beautiful ways to make a stump work for your yard rather than against it.
My personal favorite remains the stump planter — it’s easy, low-maintenance, and produces new beauty every season.
But the right choice really depends on your yard, your household, and how much time you want to invest. Start with whichever idea excites you most, and don’t be afraid to experiment.
Have you tried any of these with your own stump? I’d love to hear what worked for you in the comments below.
Related Posts: