How to Scarify Your Lawn
Last Updated on April 24, 2026 by Duncan
A lush, healthy lawn requires more than regular mowing and watering. Over time, a layer of dead stems, roots, and organic debris accumulates between the living grass and the soil surface.
Left unchecked, this layer — called thatch — gradually chokes the lawn, blocking water, nutrients, and air from reaching the roots.
Scarification is the process of cutting through and removing that buildup to restore the lawn’s ability to breathe and grow.
This guide covers everything you need to know about scarifying: what it is, how it differs from dethatching, when and how often to do it, the tools involved, and how to revive your lawn afterward.
Scarification vs. Dethatching: What Is the Difference?
Both scarifying and dethatching are lawn care practices that remove thatch, moss, and accumulated organic debris from the base of the grass — but they differ significantly in depth and intensity.
Dethatching is a lighter process that removes surface-level thatch accumulation without penetrating deeply into the lawn. It is appropriate for thatch layers under half an inch and can be done with a standard spring tine rake.
Scarification is more aggressive. The blades or tines of a scarifier cut down into the thatch layer and through the mat of dead organic material, removing heavier buildup that dethatching alone cannot address.
Scarification also scratches the soil surface, improving aeration and creating better conditions for new seed germination. Think of it as a deep clean for your lawn rather than routine maintenance.
The distinction matters because scarifying a lawn that only needs light dethatching is unnecessarily stressful for the grass — and dethatching a lawn that needs proper scarification will not solve the problem.
Why Scarify Your Lawn?
Thatch contains lignin — a tough, slow-degrading organic polymer that gives plant cell walls their rigidity.
Soil microbes, fungi, and bacteria break lignin down naturally, but when a lawn produces new organic matter faster than the microbial community can decompose it, thatch accumulates.
Once the layer exceeds half an inch, it creates a range of compounding problems.
Scarifying your lawn delivers the following benefits:
- Allows air, water, and nutrients to penetrate the soil freely, directly supporting root development and overall grass health
- Removes accumulated moss and weakens weed establishment — both of which compete with grass for the same resources
- Cuts through compacted surface layers, reducing soil compaction and improving drainage
- Revitalizes thin, tired-looking lawns by removing the debris that suffocates new growth
- Reduces the conditions that allow moss to return, since moss thrives in damp, poorly aerated, compacted environments
Signs that your lawn needs scarifying:
- The grass feels spongy underfoot — a reliable indicator that thatch has built up to a significant depth
- Thinning or patchy grass that is not recovering despite adequate watering and feeding
- Visible matted areas of dead, compacted organic material at the base of the grass blades
- Persistent moss that returns season after season despite treatment
- Water pooling on the lawn surface rather than soaking in promptly
If the thatch layer has reached or exceeded half an inch — which you can confirm by cutting a small cross-section wedge of lawn with a knife and measuring the brownish layer between the green blades and the soil — it is time to scarify.
When Is the Best Time to Scarify?
Timing is critical. Scarifying causes visible short-term stress to the lawn, and the grass needs to be in an active growth phase to recover quickly.
- Cool-season grasses: Scarify in early autumn (September to October) as the primary window, when soil is still warm enough for rapid regrowth but temperatures are cooling. Early spring (March to April) is a viable secondary window, though autumn is preferred because the lawn has the entire growing season ahead of it after spring scarification
- Warm-season grasses: Scarify in late spring (May to June) when the grass is growing most vigorously
Avoid scarifying in summer heat — the additional stress on an already heat-stressed lawn can cause significant damage. Also avoid scarifying when the ground is wet or the grass is damp.
Wet conditions cause the tines to pull up live grass by its roots rather than cutting cleanly through thatch.
The ideal working temperature is between 15°C and 20°C (59°F to 68°F) with dry conditions in the days leading up to the job.
How Often Should You Scarify?
For most lawns, scarifying once a year is sufficient. Lawns with heavy moss problems, high foot traffic, or dense thatch accumulation may benefit from twice-yearly scarification — once in spring and once in autumn.
Lawns in good condition that receive regular light dethatching may only need deep scarification every two to three years.
Over-scarifying — particularly going too deep or too frequently — can thin a healthy lawn unnecessarily, so the goal is to address what is present rather than to scarify on a rigid schedule regardless of need.
What Tools Do You Use to Scarify a Lawn?
Manual Scarification: The Dethatching Rake
A dethatching rake — also called a spring tine rake — has sharp, closely spaced tines designed to cut through and pull up thatch rather than simply moving debris on the surface. Manual scarification is appropriate for small lawns and lighter thatch accumulations.
How to manually scarify your lawn:
- Mow the lawn to a low height before starting — this improves visibility of the thatch layer and gives the rake better access to the material below the grass canopy
- Work across the lawn in parallel lines, pulling the rake firmly toward you with enough pressure to engage the tines in the thatch layer — but not so forcefully that you tear out healthy grass roots
- After the first pass, work across the lawn again in the perpendicular direction. The second pass catches any debris that was displaced rather than removed on the first pass, and loosens matted material from different angles
- Collect and remove all debris from the lawn surface — do not leave pulled-up thatch lying on the grass
- If working in spring, leave small piles of the removed moss and dead grass in quiet corners of the garden — birds actively collect this material for nest building
A useful principle: treat scarification as controlled pruning, not eradication. The goal is to remove the damaging excess while leaving enough organic material and grass intact to support a healthy recovery.
The first time I scarified manually, I was shocked by how much material came up — easily several wheelbarrow loads from a modest-sized lawn. I had underestimated how thick the thatch had become.
The lawn looked rough for about two weeks afterward, but by the end of the month it was noticeably denser and greener than it had been all season. That visual payoff made it an annual habit.
Electric or Petrol Scarifier
For larger lawns or significant thatch buildup, a powered scarifier is far more practical and produces more consistent results than manual raking.
Most tool hire shops offer scarifier rentals, making it unnecessary to purchase one outright if you scarify only once or twice a year.
How to use an electric scarifier:
- Mow the lawn to a low height before scarifying — the shorter the grass, the more effectively the scarifier tines reach the thatch layer
- Read the operator manual and follow all safety instructions before starting the machine
- Set the blade or tine depth to between ¼ and ½ inch, depending on the thickness of your thatch. Start shallower and increase depth on subsequent passes if needed — going too deep on the first pass risks damaging roots
- Work across the lawn in parallel lines with a slight overlap on each pass, similar to mowing
- Repeat the process in the perpendicular direction, reducing the machine’s depth setting slightly for the second pass
- If the scarifier does not have an onboard collection box, rake up the debris manually after each pass or run a rotary mower on a high cutting height setting to collect the loosened material
- Once all debris is cleared, collect it using a rake or lawn vacuum and dispose of it or compost it away from the lawn
- Water the lawn and apply a lawn fertilizer promptly after scarifying to support recovery
I rented a petrol scarifier for the first time after years of doing it manually. The difference in thoroughness was significant — it covered the whole lawn in about a quarter of the time and went to a consistent depth in a way my raking never quite managed.
The lawn looked worse immediately after (bare in patches, stripped-looking) but recovered within three weeks to the best condition it had been in for years. Well worth the rental cost.
How to Revive Your Lawn After Scarifying
Scarifying causes visible stress to the lawn — expect it to look rough, thin, and patchy for one to three weeks afterward. This is normal.
With the right follow-up care, the grass recovers quickly and emerges in significantly better condition than before.
Step 1: Aerate the Lawn
Aeration immediately after scarifying compounds the benefit — the freshly cleared surface makes it easier for aeration holes to open and remain clear.
Aerate using a garden fork pushed into the soil every six inches across the entire lawn, or use a mechanical aerator for larger areas.
Aeration improves drainage, reduces remaining compaction, and creates the right conditions for new root growth. Aim to aerate at least once a year as part of your regular lawn care routine.
Step 2: Address Soil pH If Moss Is Present
If moss is a recurring problem, test the soil’s acidity using a pH testing kit. Moss thrives in acidic soil — a pH below 6.0 creates conditions that strongly favor moss over grass.
If the test confirms low pH, apply ground limestone (calcium carbonate) to raise it toward the 6.5 to 7.0 range that most lawn grasses prefer.
A single application will not produce instant results — soil pH correction is a gradual process that typically takes several months to register.
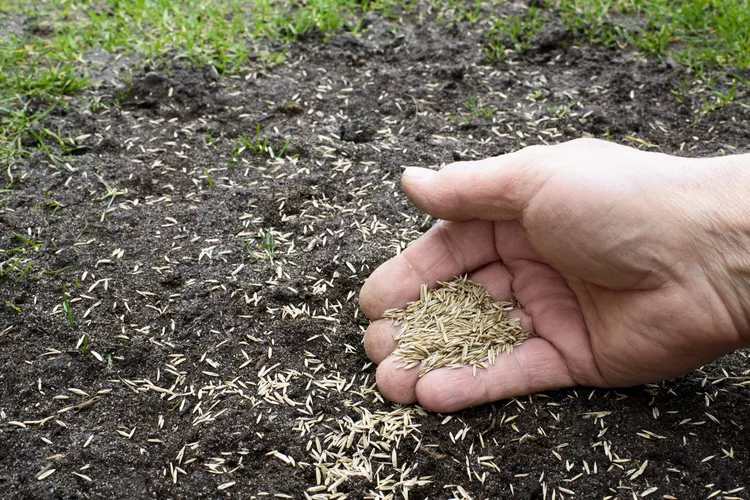
Step 3: Overseed Bare Patches
After scarifying, bare and thin areas should be overseeded promptly while the soil surface is disturbed and receptive to seed. Follow these steps for reliable germination:
- Rake the bare soil surface lightly to remove any remaining stones or debris
- Broadcast grass seed evenly across bare areas at the recommended rate for your grass type
- Rake gently to press the seed lightly into contact with the soil — seed sitting on loose debris or air gaps will not germinate reliably
- Firm the seeded area by walking over it gently or pressing with a light roller
- Water immediately and keep the seeded areas consistently moist until germination is complete
Step 4: Apply Liquid Moss Control
After scarifying a lawn with significant moss, apply a liquid moss control product to prevent immediate reinfestation.
Moss control does not kill moss permanently — it suppresses it and buys time for the grass to thicken up.
A dense, healthy lawn is the most effective long-term moss deterrent, because established grass shades the soil and creates conditions inhospitable to moss growth.
Step 5: Feed the Lawn
Apply a balanced lawn fertilizer after completing the above steps to support rapid recovery and new growth.
In autumn, use a fertilizer formulated for fall application — higher in potassium and lower in nitrogen — to strengthen the grass heading into winter rather than pushing excessive soft growth.
Why Is My Lawn Full of Moss?
Moss is a symptom, not the primary problem. It establishes itself when soil conditions favor it over grass — specifically in areas with poor drainage, compacted soil, excessive shade, high acidity, or persistent surface moisture.
Moss does not crowd out healthy grass; it fills the gaps where grass has already thinned or died due to one of those underlying conditions.
Treating moss with a chemical product without fixing the underlying conditions will produce temporary results. The moss will return.
Correcting soil drainage, pH, compaction, and thatch levels through scarifying, aerating, and correct fertilization is what permanently reduces moss, because it restores the conditions under which grass thrives and moss cannot compete.
What Will Kill Moss Without Harming Grass?
No product permanently eliminates moss. Chemical moss killers — typically iron sulfate-based products — turn moss black and desiccate it, making it easier to rake out, but they do not address the conditions that allowed moss to establish in the first place.
The most effective long-term approach is a consistent lawn care regimen: scarify to remove accumulated thatch and debris, aerate to improve drainage and soil health, mow at the correct height to encourage dense grass growth, and apply moss control after each scarification as a preventative measure.
A lawn that is genuinely dense and healthy suppresses moss naturally — the grass canopy shades the soil and outcompetes moss for space and moisture.
For a comprehensive introduction to the process, see our guide on lawn scarification for beginners.
Frequently Asked Questions
Will my lawn look worse after scarifying?
Yes, temporarily. Scarifying removes significant material from the lawn surface and the grass will look thin, patchy, and rough for one to three weeks afterward.
This is a normal part of the process and not a sign that something went wrong.
As long as the scarifying was done at the right time of year — when the grass is in active growth — the lawn recovers quickly and emerges denser and healthier than before.
Can I scarify a wet lawn?
No. Scarifying a wet or damp lawn causes the tines to grip and pull live grass out by its roots rather than cutting cleanly through dead thatch material.
Wait until the lawn has been dry for at least two consecutive days before scarifying. The soil should be firm and the grass blades dry to the touch.
Should I fertilize before or after scarifying?
After, not before. Fertilizing before scarifying wastes a portion of the product, which will be physically removed along with the thatch.
Apply fertilizer — and overseed if needed — immediately after scarifying and clearing the debris, when the soil surface is open and receptive to both.
How deep should a scarifier be set?
Set the blades or tines to between ¼ and ½ inch depth for most lawns. Start at the shallower end and assess the amount of material being removed before going deeper.
The goal is to cut through the thatch layer without penetrating into healthy root tissue. Setting the scarifier too deep — particularly on the first pass — can remove too much living material and slow recovery significantly.
Is scarifying the same as raking?
Not quite.
An ordinary garden rake moves surface debris. A dethatching rake or scarifier cuts down into the thatch layer and lifts material that is physically interwoven with the base of the grass — material that a regular rake cannot remove without tearing the lawn apart.
The tine design and downward cutting action are what distinguish scarifying tools from standard rakes.
Related Posts: