How To Preserve A Tree Stump You Want To Use
Last Updated on May 10, 2026 by Duncan
When I cut down a silver maple in my backyard two years ago, I wasn’t ready to let go of the stump. It was wide, had beautiful grain, and I had already pictured it as a side table on my patio.
But I made a classic beginner mistake — I didn’t preserve it properly. Within six months, one side had developed deep, ugly cracks and a patch of soft rot had started creeping in from underneath.
I had to start over with a different stump, this time doing things the right way. That experience taught me more about wood preservation than any article I’d ever read — and it’s the reason I’m writing this one.
Whether you want to use your stump as furniture, a planter, a garden feature, or a work of art, preservation is the step most people skip — and the one that determines whether your stump lasts five years or fifty. Here’s exactly how to do it right.
Step 1: Uproot the Stump First
This is the step that surprises most people. Before you sand, seal, or do anything else — the stump needs to come out of the ground.
Here’s why: as long as the stump remains connected to its roots, it continues drawing moisture and oxygen up through the wood.
That constant dampness creates the perfect conditions for rot, mold, and wood-boring insects. You can apply every preservative on the market and it won’t matter — a stump still in the ground will keep pulling in the moisture that undoes your work.
Saw the stump evenly and as level as possible, cutting it a few inches above ground level. If the stump is small, you may be able to manage this yourself with a chainsaw.
For larger stumps with deep root systems, hiring a professional arborist is worth the cost — they’ll remove it cleanly without damaging the surrounding yard.
From experience: When I uprooted my second stump, I was surprised by how much moisture came off the root ball even weeks after the tree had been cut.
That moisture would have been feeding directly into the wood I was trying to preserve. Getting it out of the ground first made an enormous difference to the final result.
If the stump is too large or too deeply rooted to remove — don’t worry. Scroll to the section below on what to do with an in-ground stump. There are still excellent options for you.
Step 2: Dry the Stump Out Completely
Once uprooted, move the stump to a dry, sheltered area — a garage, shed, or covered porch works perfectly. The goal is to let it dry out slowly and naturally, away from rain and ground moisture.
How long this takes depends on several factors:
- The species of tree (denser hardwoods take longer than softwoods)
- The diameter and thickness of the stump
- How wet the stump was when cut
- The humidity and temperature of your drying area
As a general rule, expect 6 months to a full year for most stumps to dry adequately. Larger or denser stumps can take even longer.
As the wood dries, you’ll notice cracks forming — this is completely normal. Wood contracts as it loses moisture, and those cracks are the natural result of that process.
What you want to avoid is drying the stump too quickly (for example, placing it near a heat source). Rapid drying causes wide, deep cracks that can split the stump irreparably and make it unusable for furniture or decorative purposes.
Patience here pays dividends later. I placed my second stump in the corner of my garage on a pallet (to allow airflow underneath) and left it for eight months.
When I came back to it, the cracks were narrow and manageable — nothing like the disaster from my first attempt.
Step 3: Remove the Bark and Sand the Surface
Once the stump is fully dried, the bark will almost certainly have begun to loosen on its own — that’s normal and makes your job easier.
Work your way around the stump, peeling the bark away by hand. For any stubborn sections, use a wood chisel, hammer, or pry bar to work it free. Don’t force it with anything that could gouge the wood beneath.
With the bark removed, it’s time to smooth the surfaces. You have a few options depending on the tools you have available:
- Power planer: Run it across the top and bottom of the stump to remove any high spots or rough patches. Continue until both surfaces are smooth and even.
- 80-grit sandpaper: Work in circular motions across the entire surface. This removes the top layer of weathered wood and reveals the fresh, clean grain underneath. It also does a good job of leveling the top of the stump for a flat surface.
- Electric sander: If the stump is large or particularly rough, an orbital or belt sander speeds up the process considerably. Run it back and forth until the grain is consistent and smooth.
Finish by wiping the entire stump down with a dry cloth to remove all wood dust before moving on. Any dust left on the surface will interfere with how well your filler and stabilizer bond to the wood.
Tip: After the initial sanding with 80-grit, do a second pass with 120-grit sandpaper for a noticeably smoother final finish — especially important if you’re making a tabletop or any surface people will touch regularly.
Step 4: Fill the Cracks with Clear Epoxy
Cracks in a dried stump are expected, but deep or wide ones need to be addressed before sealing. Left unfilled, they can harbor moisture and expand further over time — eventually compromising the structural integrity of the piece.
The best product for this job is clear epoxy wood filler. It’s strong, dries to a nearly invisible finish, and bonds deeply into the crack rather than just sitting on the surface.
Before applying, tape off the sides and bottom of the stump to prevent the epoxy from running off and creating a mess. Then apply it in layers rather than all at once:
- Apply the first layer into the cracks, working it in gently with a spatula or craft stick
- Let it dry overnight
- Apply a second layer to top up any shrinkage
- Once fully cured, lightly sand the filled areas so they’re flush with the surrounding surface
For very deep cracks, a third layer may be needed. The goal is a smooth, solid surface with no gaps that could trap water later.
If the cracks have a beautiful natural character you want to preserve — as is popular in live-edge furniture — you can intentionally leave some cracks unfilled and instead seal them with a clear finish that showcases rather than hides the wood’s natural texture. This is a legitimate design choice, not a compromise.
Step 5: Apply Wood Stabilizer and Sealer
This is the final and most important preservation step. A wood stabilizer penetrates deep into the grain and essentially hardens the wood from the inside out, making it far more resistant to future moisture, cracking, and rot.
If your stump dried without significant cracks and is in good structural shape, skip straight to this step after sanding.
Apply the stabilizer in circular motions, working it evenly across the entire surface. Cover with plastic sheeting and let it cure for two to four hours, then apply a second coat.
Two coats is typically sufficient for most applications. Once cured, your stump is structurally stable and ready for whatever purpose you have in mind:
- As a table or chair: Attach legs using heavy-duty screws or hairpin legs for a modern look. Finish with a clear exterior polyurethane for an additional weatherproof layer.
- As a planter: Move it to its permanent location before filling with soil — preserved stumps are heavy. Drill drainage holes if they aren’t already present.
- As a decorative piece: Apply a final coat of tung oil or Danish oil to bring out the warmth of the grain and add a beautiful natural sheen.
What If You Can’t Uproot the Stump?
Sometimes the roots go too deep, the stump is too massive, or the cost of professional removal simply isn’t feasible. That doesn’t mean you’re stuck with an eyesore. An in-ground stump can still be preserved and transformed — you just need to work with it where it sits. Here are the best options:
Create a Container Garden on the Stump
An in-ground stump makes a natural, rustic base for a planted container garden — and this is one of the easiest weekend projects you can take on.
Start by applying a coat of polyurethane to the exterior of the stump to slow natural rot and discourage wood-boring insects. Then form a planting basket using an old wire basket or a piece of galvanized steel field fencing cut and shaped to size.
Set the basket on top of the stump, pack it firmly with damp moss around the wireframe, then fill the interior with a soilless potting mix containing fertilizer.
Water thoroughly to remove air pockets, then plant whatever you like — trailing flowers, herbs, succulents, or seasonal color. The moss-wrapped wire basket blends beautifully with the aged wood and looks like it belongs there naturally.
Cut a Bench Into the Stump
If the stump is large enough, it can be turned into a permanent garden bench — a feature that adds real character to any yard and gives visitors an unexpected place to sit and take in the surroundings.
Use a commercial chainsaw to rough out the bench shape, then switch to a smaller saw to sculpt the seat, back, and sides with more precision.
Once shaped, sand the seating surfaces smooth and seal with a penetrating exterior sealer or clear marine finish to protect against weathering. Reapply the sealer annually to keep the bench in good condition year after year.
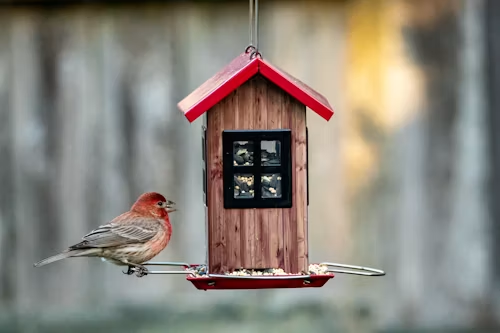
Install a Birdhouse on a Tall Stump
A tall in-ground stump is a natural pedestal for a birdhouse or bird feeder. For a rustic, cohesive look, construct the birdhouse from branches — a log cabin style that complements the stump base perfectly.
One important addition: fit a wide plastic or metal baffle around the stump below the birdhouse. This prevents squirrels, cats, and other predators from climbing up and disturbing nesting birds. It’s a small detail that makes the birdhouse genuinely functional rather than just decorative.
Commission a Stump Sculpture
A chainsaw artist can turn even an average-looking stump into a genuine focal point — owls, bears, faces, abstract forms, or anything you can imagine.
The in-ground stump’s stability actually makes it ideal for carving, since there’s no risk of the piece tipping over.
If you have the skills, you can tackle this yourself. Otherwise, search for a local chainsaw sculptor and look at their portfolio before committing.
Once carved, seal the sculpture periodically with a clear marine finish or penetrating exterior sealer to prevent splitting and preserve the detail work. A yearly application before winter is a good habit.
Build a Farm Table Around the Stump
If you have the yard space for it, an in-ground stump makes a surprisingly solid table base. First, make the top of the stump as flat and level as possible — a chainsaw, planer, and sandpaper will all help here.
For the tabletop, the material is up to you: a slab of wood, a piece of cut stone, a concrete pour, or even a sheet of weatherproof glass.
Secure the tabletop using one or more large bolts driven through the surface and anchored into the stump. A well-made stump farm table is a conversation piece that no garden furniture catalog can replicate.
Long-Term Maintenance: Keeping Your Preserved Stump in Good Shape
Preservation isn’t a one-time job. To keep your stump looking good for years, build these habits into your annual routine:
- Re-seal once a year: Whether the stump is indoors or out, a fresh coat of sealer or stabilizer prevents new moisture from penetrating the grain over time.
- Inspect for cracks: Small new cracks can be filled quickly with epoxy before they deepen. Catching them early saves a lot of work later.
- Check for insect activity: Look for fine wood dust (frass), tiny holes, or soft spots — signs that wood-boring beetles or termites have moved in. Treat immediately with an appropriate insecticide.
- Keep it off direct ground contact: For uprooted stumps used as furniture, ensure they’re elevated slightly — on legs, felt pads, or a sealed base — so moisture can’t wick back in from below.
Final Thoughts
Preserving a tree stump takes more patience than skill, but the investment is absolutely worth it. Done right, a preserved stump can serve as a piece of furniture, garden art, or a living planter for decades — far outlasting most store-bought alternatives.
The biggest lesson I took from my own failed first attempt: don’t rush the drying phase. Everything after it is straightforward.
But a stump that hasn’t fully dried will undermine every product you apply over the top of it. Give it the time it needs, and the rest of the process is genuinely enjoyable.
Once you have your stump preserved, you might be looking for inspiration on what to actually do with it. For more creative ideas, read this article on what to do with a tree stump in your front yard — there are 11 ideas that might surprise you.
Related Posts: