Your Lawnmower Sputtering and Dies? Causes & How to Fix It
Last Updated on September 1, 2020 by Duncan
When you start the lawnmower, you expect it to continue running until you switch the engine off.
In a standard, properly working lawnmower, this is the case, but if your machine has a problem, you will experience your lawnmower sputtering and dies.
For the lawnmower engine to run smoothly, it needs the right mixture of air, fuel, and spark. If any of these is missing or in the wrong quantities, the lawnmower will cough, sputter, and die out.
Thankfully, if you are a DIY ninja, you can troubleshoot most of the causes of a sputtering lawnmower and fix them.
In this article, we are going to look at the reasons why your lawnmower is sputtering and dying and what you can do to fix it.
Buckle up for the ride.
There is water in the fuel tank.
If you are fond of leaving your lawnmower outside in all kinds of weather, water is bound to find its way into the fuel tank.
Leaving gas in the tank for months can result in the accumulation of moisture, especially if you use fuel with high ethanol content.
Ethanol attracts moisture that exists as a suspension in the gas, so if you leave the mower sitting for months, the water settles to the bottom of the tank making your lawnmower sputter and die.
Your lawnmower tank will also get water from condensation.
If you store your lawnmower in an area where it gets too hot during the day and too cold during the night, the cooling and heating process will result in water in your fuel tank.
The process results in a partial vacuum that pulls moist air into the fuel tank where it condenses and settles to the bottom.
You can easily spot water in your fuel tank by looking in the gas tank. Water is heavier than gasoline, so it will sink to the bottom. Luckily, you can easily spot it with a flashlight.
Move the mower into the shade or move it inside the garage and shine a flashlight into the tank. Water forms globules in gasoline, so if you see bubbles, there is water in your fuel tank.
If you are still unsure, there is water in your tank, loosen the fuel line and let a few drops of fuel drip onto a piece of metal or wood. If there is water in the fuel, it will bead up.
For your lawnmower to continue functioning properly, you need to get rid of the water. Begin with disconnecting the spark plug, so the lawnmower motor doesn’t accidentally start while working.
Since water and fuel don’t mix, you can salvage some fuel, but it’s wise to remove all the fuel in the tank and dispose of it in the local disposal facility for recycling then refill the tank with fresh fuel.
With a pair of work gloves on, place the siphon tube into the gas tank and start siphoning. You should direct the gas into a gas can then seal the can after removing all the gas from the mower.
After removing the gas, now remove the water. Before refilling the tank with fresh fuel, blow compressed air through the fuel line to dry it out.
You also should first dry out the fuel tank by blowing compressed air into it or letting it dry overnight.
Your carburetor has problems.
The carburetor combines air and fuel in the right proportions to minimize fuel consumption and maximize power.
Carburetors adjust the balance of fuel and air based on plenty of factors such as the type of terrain you are mowing, the length of time the lawnmower has been running, and your mowing speed.
The carburetor might be having problems and not functioning properly, but the engine will still run.
When there is too much air and little fuel, you will experience diminished engine power. When there is too much fuel and not enough air, your lawnmower will consume a lot of fuel.
If your carburetor can’t balance the two, your lawnmower sputters and dies.
Unless you have the necessary skills, you should avoid repairing the carburetor on your own. Hire a professional service provider to troubleshoot the problem and fix it.
The professional will also clean the carburetor and replace the parts that need replacement.
If you have had your lawnmower for less than a year, it’s most likely covered by warranty, so you can take it to the manufacturer and have it fixed at no cost.
If your lawnmower is old and not covered by warranty, find a local small engine repair professional and have the carburetor problem fixed.
The air filters are dirty.
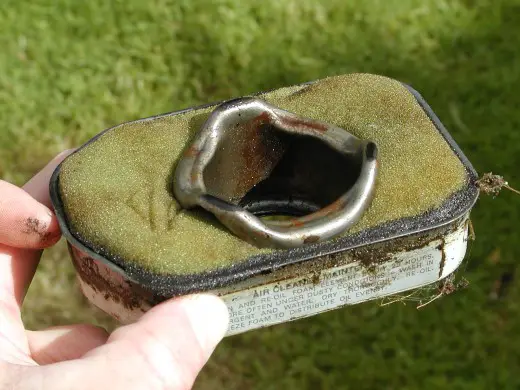
Air filters remove dirt, dust, grass, and other grime from the airstream before it enters the engine.
When you have dirty, clogged air filters, you starve the engine of oxygen, resulting in a reduction in power, increased fuel consumption, flooding of the carburetor, and lawnmower sputtering.
For an optimally functioning lawnmower, you need to clean the air filters. If your mower has foam filters, wash them with hot water and soap then squeeze them dry in a cloth.
To have an easy time, clean the filters every 25 operating hours. Got paper filters? Replace them once per season or after 300 hours of operation.
You can clean the paper filters by blowing from the inside with compressed air, but when you do this, you don’t get the best results. You are better off replacing them.
Lawnmower air filters are located near the top of the engine, encased in a plastic or metal shroud that is often secured by a screw or snap fittings. To properly clean them, follow these steps:
- Stop the engine and wait for it to cool and the moving parts to come to a halt.
- Disconnect the spark plug, so the lawnmower doest accidentally start running.
- Remove the air filter cover.
- Clean the foam with water and soap. To catch dust passing through the foam, pour motor oil on the foam and massage it.
- If the foam has become stiff, brittle, or significantly stained, consider replacing it.
- Remove the old paper filter, discard it, and replace it with a new one.
- Reattach the protective shroud taking care not to pinch and damage the air filter. Never force the shroud into place. If you are having trouble reassembling it, chances are you have inserted the new filter element incorrectly.
- Reconnect the spark plug wire and start the lawnmower
Tip: “Never operate the mower without an air filter as you will cause serious damage to the engine.”
You are using poor quality or the wrong fuel.
There are two types of gas you can buy from your local store: One containing ethanol and one that is pure gasoline. Ethanol blended gasoline tends to be cheaper; hence most homeowners are drawn to it.
Ethanol blended gas burns fast and has been shown to melt the plastic parts, which can lead to the lawnmower sputtering.
The gas can damage the spark plug of the motor engine.
The gas has also been shown to go bad when you let it sit in your garage for months. As you might guess, spoilt gas leads to a malfunctioning lawnmower.
To restore your lawnmower to its proper working condition, you should get rid of the wrong gas and replace it with ethanol-free gas. Luckily it’s easy to do it. Follow this procedure:
Begin with locating the fuel tank and fuel line connection to the tank. In most lawnmowers, the fuel tank is located under the seat or the hood.
You should then secure a container to collect the fuel from the fuel tank. To do this, reach the tank line connector. If you can’t reach it, use the connector to the engine.
By squeezing the clamp on the connector using a pair of pliers, disconnect the fuel line from the fuel tank or engine.
You should now drain the wrong fuel by opening the capping component of the fuel system and allow gasoline to drain completely.
After all, the fuel has drained, remove, and clean the fuel bowl. This is the part that is at more risk of getting damaged when you use the wrong fuel.
Using a wrench, unscrew and remove the fuel bowl from the carburetor. Clean the fuel bowl by wiping it with a clean towel.
Once you are done, connect the fuel bowl and the fuel line back. Screw the fuel bowl tightly then reconnect the fuel connector to the fuel tank or engine.
Once everything is in place, put the proper gas to the fuel system. When doing it, be on the lookout for any leaks. If there are any leaks, it means there are several areas you haven’t properly tightened.
The right fuel is ethanol-free gas. One of the best fuels I have come across is 5-cycle-Tru-Fuel.
While it’s a little bit pricey, it burns cleaner, ensures your lawnmower starts at the first pull, and has little chances of sputtering. You can buy it from your local store or online.
The spark plug is worn out or damaged.
The purpose of the spark plug is to spark fuel ignition creating engine combustion. When the spark plug is damaged or in bad condition, it causes sputtering, among many other issues.
While the spark plug isn’t the first thing I would check when my lawnmower is sputtering, there is no harm in giving it a look.
Before removing the spark plug, wait for the engine to cool. You should then clean away any dirt or debris surrounding the base of the spark plug. This is to prevent any debris from getting into the cylinder when you remove the spark plug.
You should remove the spark plug by turning it counterclockwise with a socket wrench and deep-set socket.
After removing the plug, pay attention to the tip of the spark plug where it enters the engine. Carefully inspect the spark plug for signs of wear. If worn out, damaged, or deteriorating, replace it.
Also, take a look at the spark plug gap. This is the distance between the two metal points on the tip of the spark plug.
Using a spark plug gauge, measure the spark plug gap and compare it with the measurement indicated in the owner’s manual. A spark plug with the wrong gap setting quickly gets fouled with carbon as it doesn’t fire properly.
You can adjust the distance by carefully bending the hook-shaped point.
There are plenty of things you can learn from the spark plug. If the spark plug has a grayish-colored tip, the engine is in proper working condition.
If the tip of the plug is covered with oil, the piston rings are damaged, and if the tip is covered with black ash, the engine air/fuel mixture is too rich, or the choke is sticking.
If the porcelain tip is broken, the fuel/air mixture is too lean, or the engine oil level is too low.
To keep your mower in top working condition, replace the plug every year as part of your annual maintenance routine.
The mower deck is too dirty.
When grass builds up in the mower deck, it significantly reduces the effectiveness of the lawnmower.
If you have a side discharge mower, the caked grass impedes the discharge hole, so the grass clumps gather instead of spreading evenly.
If you have a bagger, the build-up can limit the amount of grass that your puller can pull, leaving grass clumps on your lawn.
For a mulching mower, grass buildup reduces the space above the blades for the grass to circulate so it can be cut. When the space is reduced, it means the grass doesn’t cut properly.
The grass buildup can also prevent the lawnmower from taking in and expelling gasses properly, which puts it at high risk of sputtering and dying.
To restore the lawnmower, you should scrape away the buildup grass. You can use a wire brush or sharp blade. Like the other repairs, remember first to remove the spark plug to prevent accidental starting.
To prevent the grass from building up, make it a habit to clean the lawnmower deck after every mow. You also should apply a non-stick cooking spray or commercial deck liner to prevent grass from getting hold of your mower deck.
For best results, go for a graphite-based liner as it not only prevents the grass from sticking to your deck, it also makes it easy to clean the deck.
Related Posts: