The Green-Thumb Guide: 14 Golden Tips for Gardeners (That Actually Work)
Last Updated on May 27, 2026 by Duncan
The most impactful gardening tips are: choose the right location before planting, use organic compost over chemical fertiliser, prune correctly ¼ inch above the bud, water an inch per week at the base (never the leaves), and grow plants that suit your climate.
For creative garden upgrades, upcycle household objects, build terrariums, add fencing, and use painted brick markers for plant identification.
Tending your own garden is one of the most rewarding things you can do outdoors. I started gardening at 15 first out of necessity, helping maintain the family plot, and then out of genuine enthusiasm as I watched things actually grow from seed to fruit.
Today I grow guavas, peaches, onions, and a rotating cast of other plants in my own garden, and I’ve learned a lot more from my mistakes than my successes.
This guide covers 14 tips I genuinely use: seven practical techniques for a healthier, more productive garden, and seven creative ideas for making it a space you actually want to spend time in.
1. Choose the Right Location
Why does garden location matter so much?
Sunlight, soil quality, drainage, and wind exposure all vary by location and choosing the wrong spot for a plant is often irreversible. Research your site before you plant anything.
Location is the single factor that underpins everything else in gardening. No amount of watering, feeding, or pruning will compensate for planting in fundamentally the wrong spot.
Before you pick up a rake, walk your garden at different times of day and map out where the sun falls and for how long. Most fruiting plants such as tomatoes, peaches, guavas need a minimum of six hours of direct sunlight.
Leafy greens tolerate partial shade. Knowing your garden’s sun map before you plant saves enormous frustration later.
Also assess:
- Soil composition: Sandy soil drains too fast; clay retains too much moisture. Both can be amended, but you need to know what you’re working with
- Natural drainage: Low-lying areas collect water after rain; high spots dry out quickly. Neither is ideal without modification
- Wind exposure: Exposed sites stress plants and dry out soil faster; sheltered spots near walls or fences can create useful microclimates
- Proximity to trees: Large tree roots compete for water and nutrients, and dense canopy creates deep shade
When I first planted onions in my garden, I chose a spot that looked clear and open. What I didn’t account for was that a neighbouring wall cast shadow over it from mid-afternoon onward.
The crop was thin and poorly developed. Moving the bed two metres to the left the following season with better afternoon sun which made an immediate and obvious difference.
Research what you want to grow first, then find the right patch of ground for it, not the other way around.
2. Use Garden Management Software
Is there software to help manage a gardening business or large garden?
Yes tools like Workever are designed specifically for gardening professionals and serious hobbyists, covering stock management, scheduling, client databases, and team communication in one place.
For those running a gardening business or managing a larger property, keeping track of everything manually, stock levels, client contacts, job schedules, team assignments becomes unwieldy fast. Digital garden management software solves this.
Workever is one of the more capable tools built specifically for gardening operations. Its notable features include:
- Stocks & Costs: Track your inventory of seeds, compost, tools, and equipment, and monitor expenditure over time so you can see exactly where your budget goes
- Contact Database: Store supplier contacts, client details, and team member information in one searchable place, accessible from any device
- Easy Communication: Built-in messaging bridges the gap between office-based admin and field staff, keeping everyone working from the same information without relying on phone calls or text threads
For hobbyist gardeners, a simpler approach is a dedicated notebook, a phone app for plant identification, or even a spreadsheet tracking planting dates and yields which delivers similar organisational benefits without the overhead.
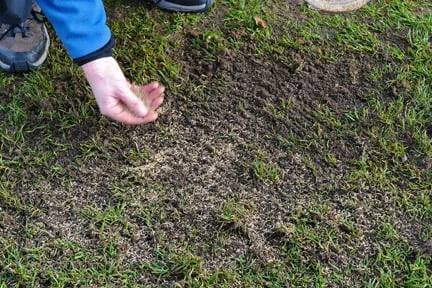
3. Make Your Own Compost
Is homemade compost better than store-bought?

One of the earliest things I learned is that healthy soil is the foundation of a healthy garden and compost is the most straightforward way to improve it.
I’ve been composting kitchen scraps for years now, and the difference in the richness of the soil it produces compared to the clay-heavy base I started with is dramatic.
What to compost:
- Fruit and vegetable peels and cores
- Eggshells (crushed)
- Coffee grounds — excellent nitrogen source and also beneficial worked directly into lawn soil
- Tea bags (paper ones, not plastic mesh)
- Dry leaves and garden trimmings
- Cardboard and newspaper (torn small)
What to avoid:
- Cooked food, meat, or dairy which attracts pests
- Diseased plant material which spreads the problem
- Anything treated with pesticides
Basic composting tips: Layer greens (nitrogen-rich, wet) with browns (carbon-rich, dry) in roughly equal volumes. Turn the pile every few weeks to aerate it.
In warm conditions, a good compost heap produces usable material in 2–3 months; in cooler climates it may take 4–6 months.
A compost bin doesn’t need to be expensive or elaborate. I built mine from four pallets wired at the corners total cost was essentially nothing, and it’s been running for three years.
4. Prune and Cut Correctly
How should you prune plants properly?

Always cut approximately ¼ inch (6mm) above a bud, angling the cut downward and away from the bud. Never cut too close or too far away as both cause problems. Prune with clean, sharp tools to prevent disease transfer.
Pruning is one of those techniques where the difference between doing it right and doing it wrong is genuinely significant.
I’ve killed stems by cutting too close to the bud as it desiccates and the bud dies with it. I’ve also left too much stub above the bud, which rots back and provides an entry point for disease.
The correct technique:
- Find the bud you want to cut above
- Position your secateurs approximately ¼ inch (6mm) above it
- Angle the blade so the cut slopes downward and away from the bud as this encourages water to run off rather than pool on the cut surface
- Make the cut in a single, clean motion, sawing back and forth damages the tissue
Why prune at all? Beyond keeping a plant a manageable size, pruning:
- Increases airflow through the canopy, reducing fungal disease
- Redirects the plant’s energy from maintaining old growth to producing new shoots and fruit
- Removes dead or diseased wood before it spreads
- Shapes the plant for better light penetration
Always disinfect your pruning tools between plants as a quick wipe with rubbing alcohol or a diluted bleach solution prevents transferring disease from one plant to another. It’s a small habit that makes a real difference, especially when working with roses or fruiting trees.
5. Understand Your Growing Conditions
What conditions do you need to consider before planting a garden?

The three most important conditions to research before planting are your local climate and frost dates, your soil’s fertility and pH, and the correct seed planting times for your region. Getting these wrong means fighting your environment rather than working with it.
Gardening is fundamentally about understanding the environment around you and making decisions that align with it. The plants that thrive in a cool, wet maritime climate will struggle in a hot, dry continental one and vice versa.
The three conditions that matter most:
Seed planting time: Every plant has a sowing window too early and seedlings get killed by late frost, too late and they don’t mature before winter.
Check your local last frost date and count backward from it using the seed packet instructions. This single piece of research prevents the most common beginner mistake of starting seeds at the wrong time.
Climate: Understand your hardiness zone (USDA zones are widely used; the UK uses the RHS hardiness scale). This tells you which plants can survive your winters outdoors, which need shelter, and which must be grown under cover. I grew up assuming guavas couldn’t thrive in my climate, a sheltered south-facing wall proved otherwise.
Soil fertility: A basic soil test is available from garden centres for a few dollars and it tells you your soil’s pH and nutrient profile.
Most vegetables prefer a pH of 6.0–7.0. Acidic soil can be raised with garden lime; alkaline soil lowered with sulphur. Knowing your baseline means you’re amending with purpose, not guessing.
6. Water and Drain Properly
How much should you water a garden and how often?

Watering sounds simple. It isn’t. More houseplants and garden beds are killed by overwatering than underwatering, and getting the balance right is one of the skills that separates good gardeners from frustrated ones.
Core watering principles:
- Water at the base, not from above. Wet foliage promotes fungal disease where mildew, black spot on roses, blight on tomatoes all get a foothold through standing moisture on leaves. Direct water to the soil around the root zone
- One inch per week is the general guideline for most vegetables and flowering plants. In hot or windy conditions, you may need more; in cool, overcast weather, less
- Deep and infrequent beats shallow and daily. One deep soak encourages roots to grow downward in search of moisture, building drought resistance. Daily light watering keeps roots shallow and creates dependency
- Yellow leaves = overwatering. Pull back immediately. Check that drainage is working as waterlogged roots rot within days in warm conditions
- Wilting at midday is often heat stress, not dehydration. Check the soil moisture before reaching for the hose
Drainage: Ensure every raised bed and container has adequate drainage holes. If your garden soil is naturally heavy clay, work in horticultural grit or composted bark to open up the structure. Poor drainage is one of the most common and least glamorous causes of plant failure.
I once lost an entire row of basil to root rot after a week of heavy rain pooled in a low section of my bed. A simple raised mound for the replanting the following season solved it entirely.
7. Start With the Right Plants
What are the easiest plants to grow for beginners?

Tomatoes, onions, basil, roses, and sunflowers are among the most forgiving and rewarding plants for beginner and intermediate gardeners.
All tolerate a reasonable range of conditions and provide visible results that build confidence.
Choosing your first plants wisely sets the tone for your entire experience. A beginner who starts with demanding, finicky species often gives up within a season; one who starts with reliable, productive plants is usually hooked for life.
Here are five plants I recommend without hesitation:
- Tomatoes: Productive, fast-growing, and deeply satisfying to harvest. Start from plug plants if you’re new, rather than seed, and choose a compact variety for containers or small beds
- Onions: Extremely hardy, low-maintenance, and useful in the kitchen. I’ve grown onions every year since I was a teenager and rarely have problems with them
- Basil: Grows fast, loves warmth and sun, and rewards you almost immediately. Keep it well watered and pinch off any flowers to extend the leafy harvest
- Roses: More forgiving than their reputation suggests, and the flowers are extraordinary. Modern shrub varieties are particularly disease-resistant
- Sunflowers: Almost impossible to fail with. Direct sow into a sunny spot after the last frost and they’ll do the rest. Children and adults both love watching them grow
See also: 9 Tools Used for Gardening Every Garden Owner Should Have — the right tools make working with all of these plants considerably easier.
8. Upcycle What You Already Own
How do you decorate a garden on a tight budget?

Repurpose household objects such as birdcages, terracotta pots, old boots, wooden crates, and even golf balls can become planters, display pieces, and functional garden features for little to no cost.
Before spending anything on garden décor, walk through your home and look at what you already own with fresh eyes. The cheapest route to a distinctive garden is creative repurposing.
Ideas that actually work:
- Birdcages as succulent displays: Hang them from a pergola or fence post and fill with small pots of succulents for a vintage, layered look
- Terracotta pot towers: String progressively smaller pots together vertically through a central rod to create a cascading herb or flower tower
- Golf ball hose guards: Drill a hole through a golf ball and thread your garden hose through the curve of a bed edge; the ball holds the hose in place and prevents it dragging across plants
- Old colanders as hanging planters: The drainage holes are built in; line with moss and plant trailing varieties for instant rustic charm
- Wooden pallets as vertical gardens: Landscape fabric stapled to the back, soil filled in, and herbs or strawberries planted in the slats
The key with upcycling is committing to a consistent aesthetic. Three different upcycled pieces in a similar style look curated; fifteen mismatched items look like clutter.
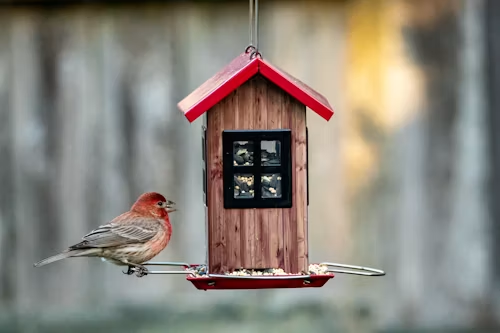
9. Invest in the Right Decorative Pieces
What garden decorations are worth buying?

LED string lights, bird feeders, and water features consistently deliver the highest visual impact relative to their cost. Buy fewer, better pieces rather than many cheap ones.
When budget does allow for purchases, spend on decorative items that pull double duty looking good while also serving a function. See our garden decoration ideas guide for a fuller overview, but here are the ones worth prioritising:
- LED garden lights: Solar-powered string lights strung through trees or along fencing transform a garden in the evening and cost almost nothing to run
- Bird feeders and birdhouses: Bring wildlife into the garden, which is rewarding in itself and also helps with pest control (birds eat aphids, caterpillars, and slugs)
- A small water feature or fountain: Even a modest one adds sound and movement that makes a garden feel alive. Circulating water also attracts birds and beneficial insects
- Decorative gnomes or garden figures: Divisive but enduring; if you like them, one or two in unexpected corners adds character and humour
Resist the urge to fill every surface. A well-chosen garden feature with clear space around it makes more impact than a crowded collection of objects competing for attention.
10. Build a Terrarium
What is a terrarium and how do you make one at home?

A terrarium is a miniature enclosed or semi-enclosed garden built inside a glass or transparent container.
You can make one cheaply using old jars, aquariums, or glass bottles, filled with a drainage layer, potting mix, and small plants or succulents.
Terrariums are one of the most satisfying garden projects to make, and they don’t require a garden at all they’re perfect for flats, windowsills, and small spaces.
They also make excellent gifts. See our miniature fairy garden DIY ideas for full project inspiration.
How to build a basic terrarium:
- Choose your container: Old fish tanks, large glass jars, or even a teapot with a wide opening all work
- Add a drainage layer: Pebbles, gravel, or horticultural grit, approximately 2–3cm deep
- Add a thin layer of horticultural charcoal if it’s a closed terrarium: This prevents bacterial build-up
- Add potting mix appropriate for your chosen plants: Cactus mix for succulents, standard mix for tropical plants
- Plant and arrange: Small ferns, mosses, succulents, and air plants are all ideal
- Decorate with pebbles, miniature figurines, or driftwood
Closed terrariums (with a lid) create their own water cycle and need minimal maintenance. Open terrariums dry out faster and need occasional watering.
Either way, keep them out of direct midday sun the glass magnifies heat and will cook the plants.
11. Install Garden Fencing
What are the benefits of fencing a garden?

Garden fencing keeps pets and wildlife out, defines your boundary clearly, provides a structure for climbing plants, and significantly improves the visual framing of the space all with minimal ongoing maintenance.
Fencing is one of those garden investments that pays off on multiple levels simultaneously. It’s not glamorous, but it changes how a garden functions and feels.
The practical benefits:
- Keeps dogs, rabbits, and other animals off flower beds and vegetable patches
- Clearly demarcates your property boundary, preventing accidental encroachment
- Provides a ready-made support structure for climbing roses, clematis, jasmine, and beans
- Creates a windbreak on exposed sides of the garden, protecting plants in open positions
The aesthetic benefits:
- A well-chosen fence style frames the garden and gives it a sense of enclosure, which makes the space feel more intentional and designed
- Painted or stained fencing creates a strong backdrop for planting dark colors (navy, charcoal, deep green) make colourful plants pop dramatically
Low-maintenance options: Timber panel fencing with capped posts lasts 10–15 years with minimal care. Metal railings are virtually maintenance-free and suit more formal garden styles.
12. Use Brick Markers for Plants
What is the cheapest way to label plants in a garden?
Write plant names directly on bricks or flat stones with a paint marker or chalk pen. It costs next to nothing, lasts a full growing season, and keeps identification clear without plastic labels blowing around the garden.
This is one of those ideas so simple it feels almost too obvious but it’s genuinely one of the most practical plant labelling methods I’ve used.
During a busy growing season, it’s easy to forget what you’ve planted where, especially for seedlings that all look identical in early spring.
How to make brick markers:
- Find flat-sided bricks or smooth stones salvaged ones work perfectly
- Write the plant name clearly with a permanent marker (Sharpie) or chalk pen
- For a more decorative version, paint the brick a solid colour first, then write on top once dry
- Seal the writing with a clear weatherproof spray or varnish. One coat is enough to make it last the season
The beauty of this method over plastic labels is weight — bricks don’t blow away in the wind, and they’re large enough to read without bending down. They also look deliberately designed rather than improvised.
13. Hand-Paint Garden Signs
How do you make DIY garden signs?

Sand and paint old wooden planks, write your message with weather-resistant paint or a paint marker, then seal with exterior varnish. These work as directional markers, plant section labels, or simply decorative pieces with quotes or garden names.
Old timber planks salvaged from a skip, a dismantled pallet, or a DIY leftovers pile make make excellent garden signs with very little effort. The imperfect, weathered look of reclaimed wood actually enhances the rustic aesthetic.
Ideas for what to put on them:
- Section labels: Herb Garden, Cut Flowers, The Vegetable Patch
- Directional arrows pointing to different areas of a large garden
- A garden name or family name on the entrance gate
- Inspirational quotes, particularly good positioned near a seating area
- Seasonal messages that you swap out a few times a year
Use exterior-grade paint or a paint marker rated for outdoor use. Seal the finished sign with a coat of yacht varnish or exterior decoupage medium this is the step most people skip, and it’s the reason their signs fade within a single summer.
Done properly, a painted wooden sign will last two or three seasons before needing a refresh.
14. Create a Painted Stone Pathway
How do you make a decorative stone pathway in a garden?

The result is a colourful, personal, and completely free feature for any garden.
A painted stone pathway is one of the most satisfying afternoon projects you can do in a garden. The materials cost almost nothing if you source the stones yourself, and the finished result looks genuinely designed.
Step by step:
- Collect smooth, flat-sided stones: Riversides, beaches, or garden centres all yield good options
- Clean and dry them thoroughly: Paint doesn’t adhere to dirty or damp surfaces
- Apply a base coat of exterior spray paint or acrylic craft paint; two thin coats are better than one thick one
- Add patterns, dots, stripes, or colours once the base is dry
- Seal with clear exterior varnish: Essential for weatherproofing
- Arrange along a path edge, in a border, or grouped around a feature plant
For a cohesive look, choose two or three complementary colours and stick to them.
A pathway with stones in the same colour family reads as intentional; one with twenty different colours reads as chaotic.
FAQ: Gardening Tips Answered
What is the most important tip for beginner gardeners?
Start with location. Understanding where your sun falls, what your soil is like, and which plants suit your climate before you plant a single thing will save you more time, money, and frustration than any other preparation.
How do I make my garden grow faster?
The three biggest levers for growth rate are light (ensure plants get the sun hours they need), nutrition (compost or appropriate feed), and water (consistent, deep watering at the roots). Address all three and most plants grow at close to their maximum potential.
What is the best organic fertiliser for a home garden?
Homemade compost is the most balanced and cost-effective. For a quick nitrogen boost, diluted liquid seaweed or fish emulsion works well.
Coffee grounds worked into the soil around acid-loving plants (blueberries, azaleas) are also effective and cost nothing.
How do you keep a garden looking good with minimal time?
Choose low-maintenance plants suited to your conditions, mulch garden beds heavily (this suppresses weeds and retains moisture simultaneously), and do small amounts of maintenance frequently rather than large overhauls infrequently. Twenty minutes a day beats a full weekend every month.
Q: When is the best time of day to water a garden? A: Early morning is ideal — the water reaches the roots before midday heat causes evaporation, and the foliage has time to dry before evening, reducing fungal disease risk. Evening watering works but leaves foliage wet overnight, which encourages mildew.
What plants grow well together?
Classic companion planting combinations include tomatoes with basil (basil may repel aphids and improve tomato flavour), roses with lavender (lavender deters aphids), and the “three sisters” corn, beans, and squash (each supports the others’ growth). Onions planted near carrots deter carrot fly; marigolds near almost anything deter a wide range of garden pests.
Summary: 14 Tips at a Glance
| # | Tip | Core Action |
|---|---|---|
| 1 | Location | Research sunlight, soil, and drainage before planting |
| 2 | Garden software | Use Workever for business or large garden management |
| 3 | Compost | Make your own from kitchen scraps; retreat every 2–3 months |
| 4 | Pruning | Cut ¼ inch above the bud, angled away, with clean tools |
| 5 | Growing conditions | Know your frost dates, climate zone, and soil pH |
| 6 | Watering | One inch per week, at the base, deeply and infrequently |
| 7 | Suitable plants | Start with tomatoes, onions, basil, roses, or sunflowers |
| 8 | Upcycle | Repurpose birdcages, pots, and pallets before buying anything |
| 9 | Invest | LED lights, bird feeders, and water features give the best ROI |
| 10 | Terrariums | Use old jars or tanks with gravel, charcoal, and small plants |
| 11 | Garden fencing | Defines space, keeps wildlife out, supports climbing plants |
| 12 | Brick markers | Mark and seal — durable, free, and wind-resistant |
| 13 | Garden signs | Sand, paint, and varnish reclaimed timber planks |
| 14 | Stone pathway | Paint, seal, and arrange pebbles along a path edge |
Related Posts: