How to Make Bird Feeders from Recycled Materials
Last Updated on July 23, 2026 by Duncan
It’s truly amazing seeing birds alight at a feeder that you’ve personally made from scratch. It’s even more amazing when you remember that the feeder started as a discarded container, like an empty plastic bottle or old milk jug.
Creating your own bird feeder out of recycled materials is a project that not only is innovative and practical, but environmentally friendly too.
And the beauty is that all you need is some creativity and time. You do not need any woodworking experience, costly equipment, or materials.
You will find everything you need lying around in your home’s recycle bin.
In just a few hours’ time, you can create your very own eco-friendly bird feeding station out of materials that otherwise would have been headed to a landfill.
With easy-to-follow instructions, along with a variety of ideas and options, this is a project anyone can tackle, alone or in groups of friends and families.
Are you wondering how you can make bird feeders from recycled materials? Here’s how to go about it and the various designs that you can choose from:
The teacup diner
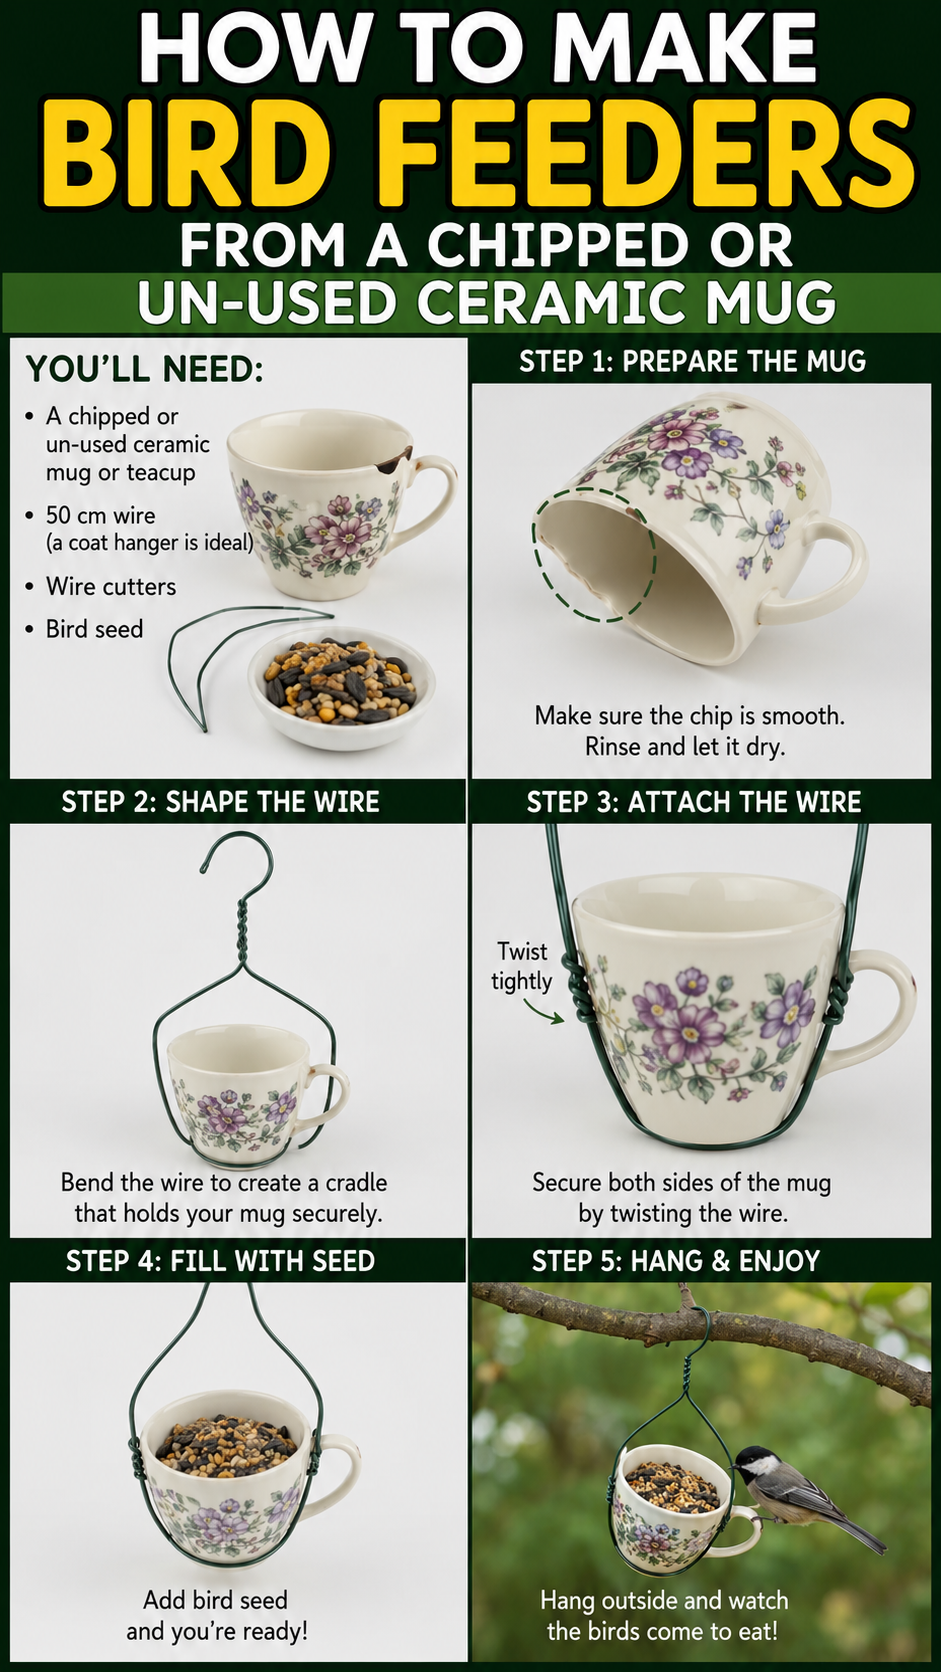
Materials you need: A chipped or un-used ceramic mug or teacup, 50 cm wire (a coat hanger is ideal), wire cutters, bird seed.
How to make a bird feeder:
- Carefully examine the mug and make sure there are no cracks in it that can potentially hurt the birds. Wash it properly and leave it out to dry thoroughly.
- Cut a piece of 50 cm wire using the wire cutters. For a coat hanger wire, straighten it first before cutting.
- Insert one end of the wire through the mug handle starting from below. This should give you a bit of wire sticking out.
- Twist the protruding end onto the rest of the wire several times using wire cutters for a secure hold.
- On the opposite end of the wire, bend the wire and create a small loop with the remaining 8 centimeters of wire twisted back onto itself.
- Make sure to adjust the angle at which the mug hangs; the slightest forward tilt will ensure that any spilled seeds will always fall to the bottom of the mug.
- Fill two-thirds of the mug with birdseed, and hang from either a tree, a pergola, or even just from a hook.
- Fill up the mug every 2 to 3 days, and give the mug a rinse weekly.
Tip: Hang two or three cups at different levels on one branch to create a unique bird “cafe” that accommodates more birds.
Wine cork raft
What you need: Wine corks between 12 and 15, jute twine or rubber bands, a bottle cap, waterproof craft glue, hanging cord measuring about 40 cm.
How to make a bird feeder:
- Gather your corks and arrange them in an array on a table top in a rectangle formation; something like 3 corks wide by 4 or 5 corks long, arranged in horizontal orientation.
- Tightly bind each row of corks using jute twine by wrapping the twine at least three times across the row and tying a tight knot.
- Repeat the above process on each row to bind the entire row.
- You should then wrap twine in the opposite direction to bind rows together. Do this until the raft becomes a well-compact bundle.
- Once you are done, place a drop of waterproof craft glue on the bottom part of the bottle cap or small jar lid and apply it in the middle of the raft surface. Wait for 30 seconds and allow drying for at least one hour.
- Loop the hanging string under the twine on one end of the raft and tie it securely. Make a hanging loop on the top of the raft.
- When the glue dries, add bird seeds to the bottle cap and hang the raft horizontally on a branch that’s low to the ground. Refill it with seeds every day, as the cap can only accommodate few seeds.
Tip: Put another bottle cap at the other end of the raft for more space.
CD spiral tower
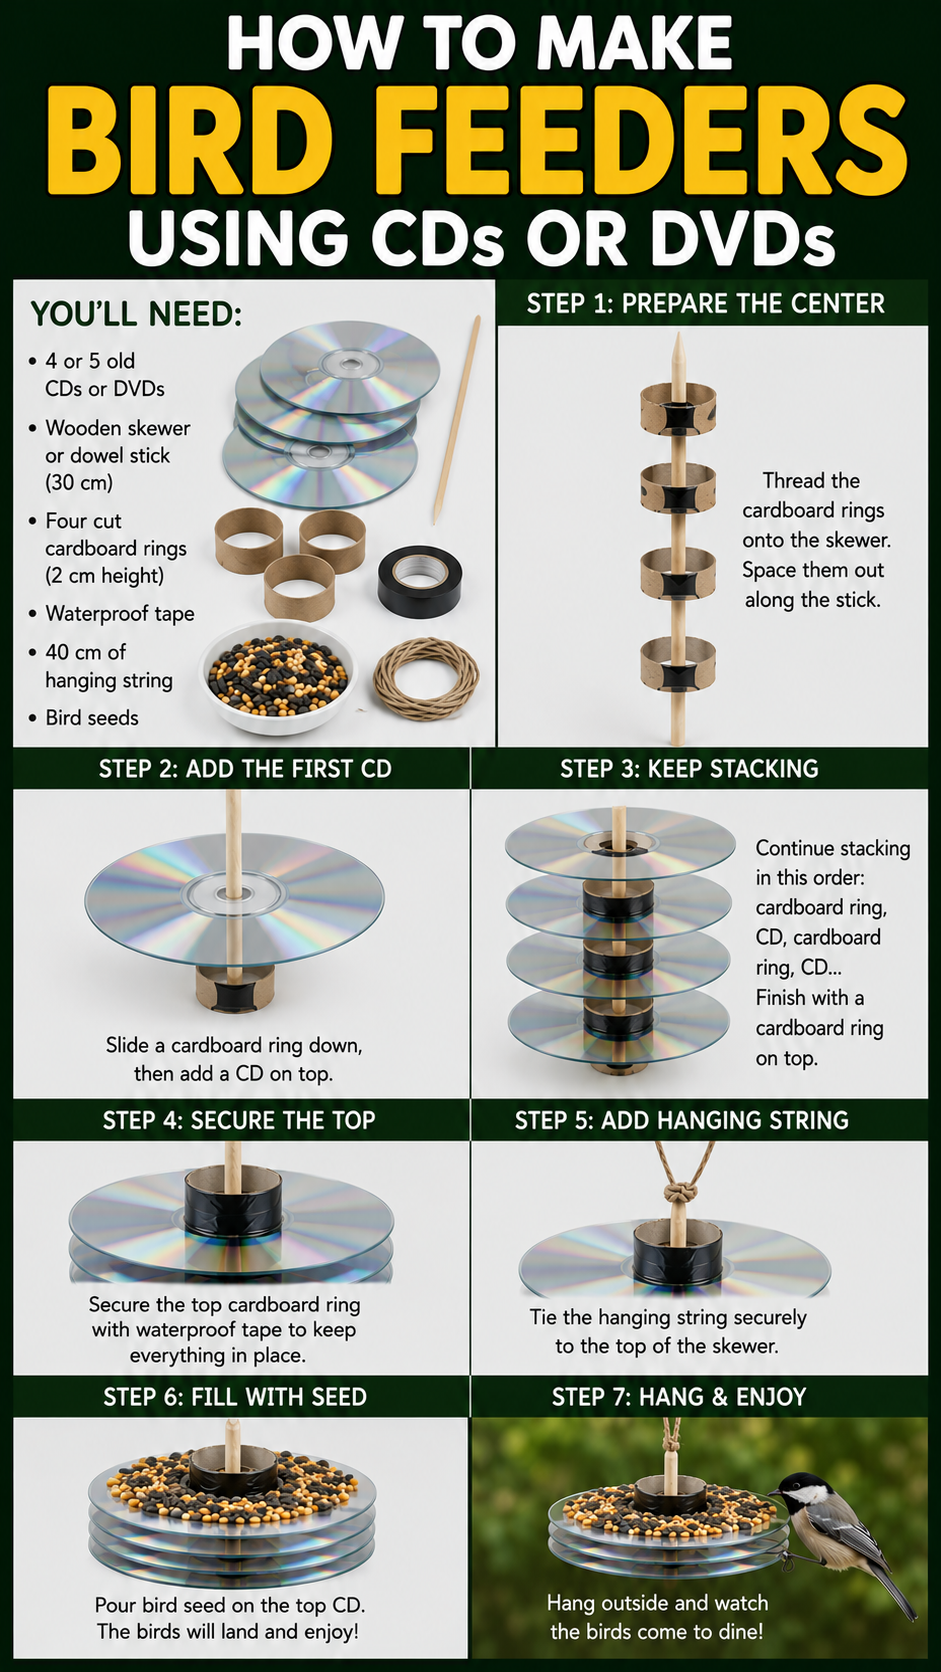
Materials you need: 4 or 5 old CDs or DVDs, a wooden skewer or dowel stick measuring 30 cm, four cut cardboard rings of 2 cm height, waterproof tape, 40 cm of hanging string, and bird seeds.
How to make a bird feeder:
- Cut the cardboard rings into four equal-sized rings of 2 cm height.
- These rings will act as spacers between the discs.
- Arrange the items in the following order from bottom to top: CD-Disc, Cardboard ring, CD-Disc and Cardboard ring. This continues till all discs are used up.
- Pierce the wooden skewer or dowel stick into the center hole of the CDs and rings while stacking up.
- Use the waterproof tape to tie around the skewer just below the lowest disc and also above the topmost disc.
- Securely tie the hanging string on the skewer approximately 3 cm above the uppermost disk, tying several knots to ensure safety, and then tie it up for hanging purposes.
- Suspend the feeders upright on a branch. There should always be a gap between the CD and the spacer ring that forms the small shelf, into which you should put the bird seeds.
- Place in an area where there is sunlight so that the reflective surface works to discourage squirrels. Refresh the shelves daily or every other day.
Tip: Apply a tiny amount of craft glue between each spacer ring and the CD to keep it from rotating excessively with the wind.
The colander café
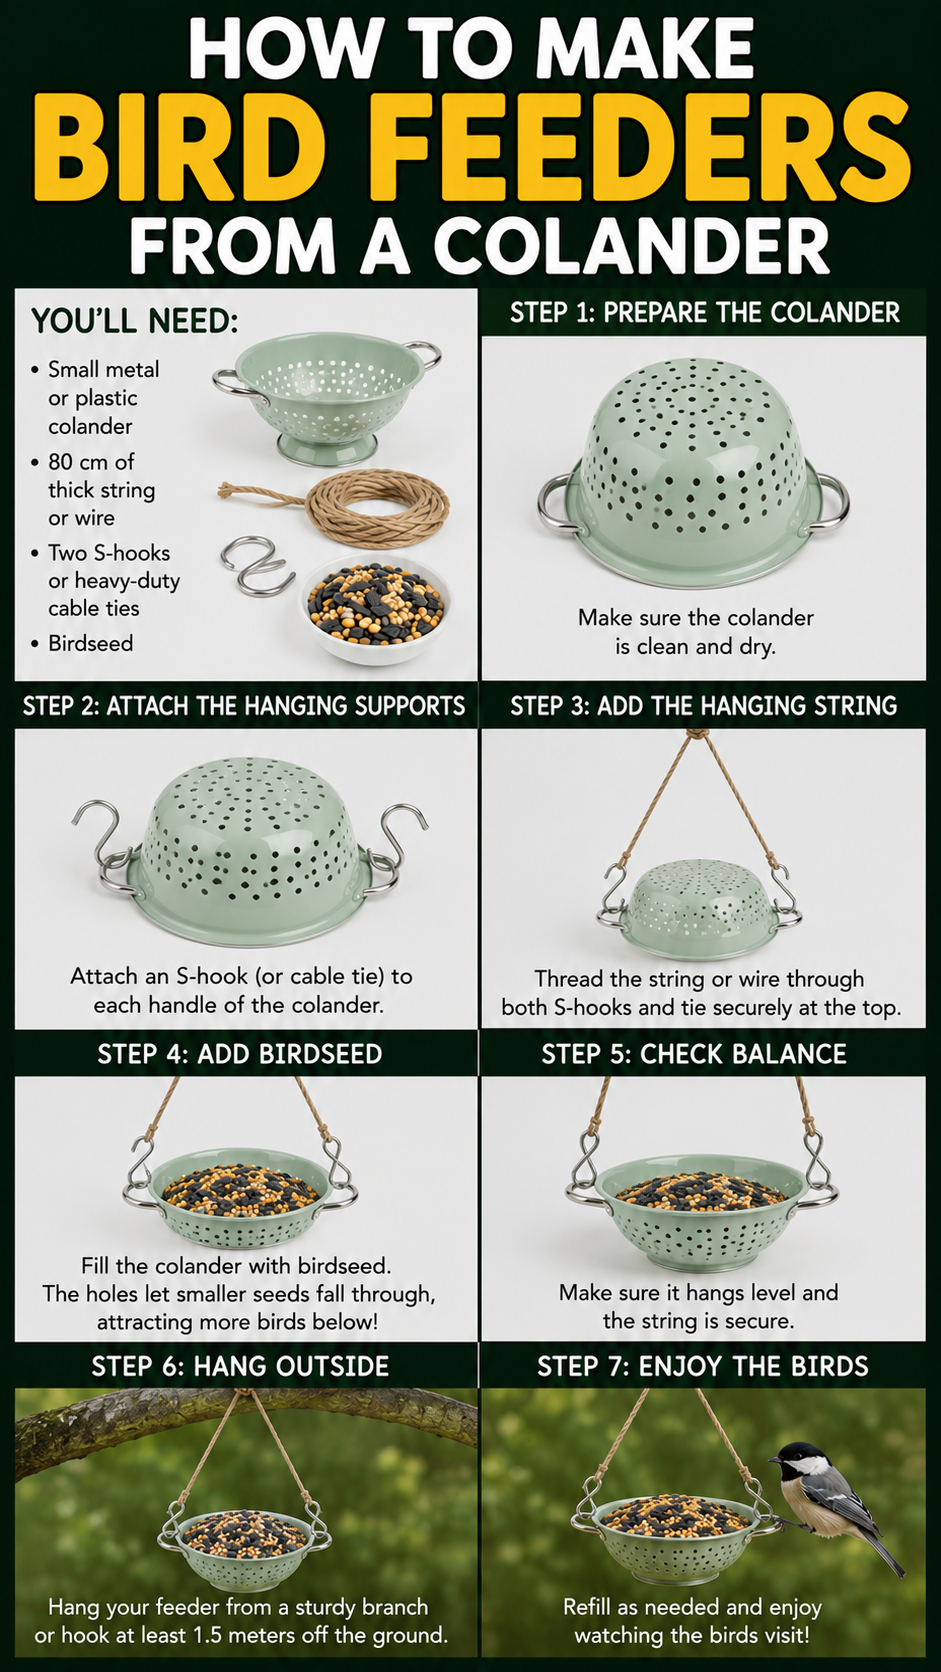
Items you need: Small metal or plastic colander, 80 cm of thick string or wire, two S-hooks or heavy-duty cable ties, birdseed.
How to make the bird feeder:
- The first step would be to clean the colander properly using hot water and dishwashing soap, removing all traces of food particles. Leave it to dry thoroughly.
- Look for two openings on either side of the colander’s edge as these will serve as the attachment points.
- Next, cut your string into two pieces that are each 40 cm long. Thread one end of each string through a hole in the colander’s edge and create a tight knot inside it.
- Then take both strings and knot them at their loose ends, forming a triangle-like formation.
- You may suspend the colander by using the S-hook attached to the overhead knot on the colander. You might also choose to fasten the colander to a branch. Make sure it is suspended absolutely level before committing to the hanging.
- Fill the colander liberally with seed. Because there are holes for draining rainwater, you’ll be able to keep the seed dry, much better than it would remain in a regular tray feeder.
- It should be suspended about 1.5 metres off the ground and clear of any point that a cat could use to launch itself onto the feeder. It will need to be refilled every couple of days.
Tip: Position a big flat rock or some bark on a low-hanging branch under the colander. There’s no reason not to attract ground feeders such as sparrows and doves.
The denim pocket pouch
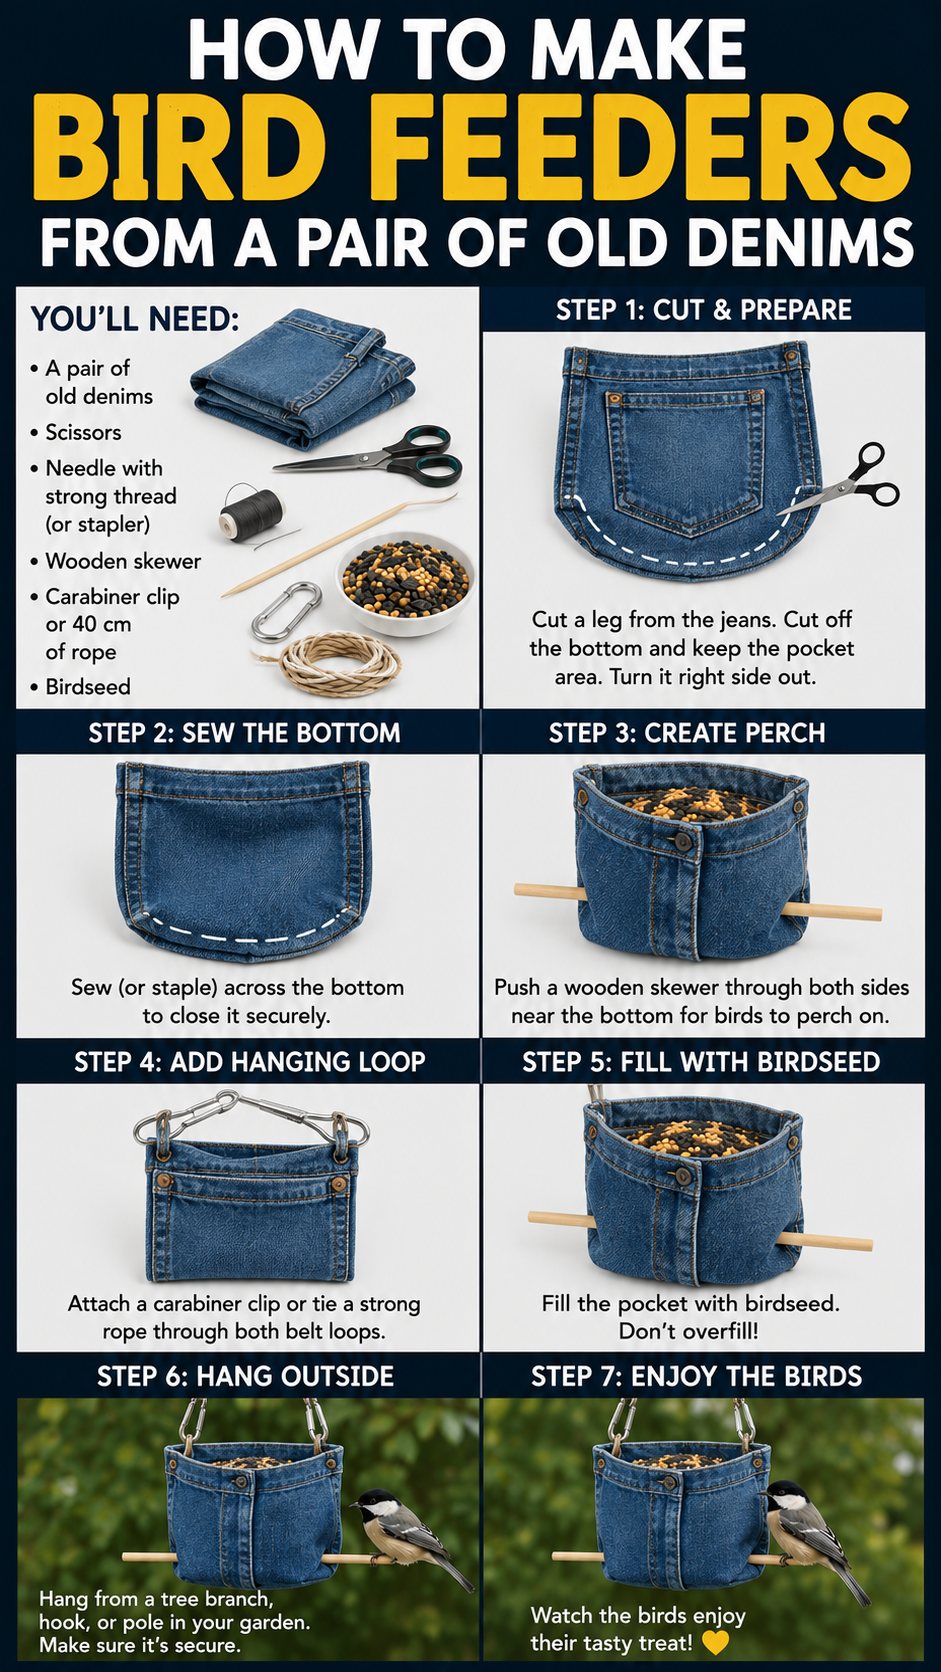
Materials you need: A pair of old denims, scissors, a needle with strong thread (or stapler), a wooden skewer, a carabiner clip or 40 cm of rope, birdseed.
How to make a bird feeder
- Spread out the old denims and locate the back pockets. Carefully cut around one pocket using scissors, leaving an excess of 1.5 cm of denim around the edges but not at the opening.
- Turn the pocket inside out and secure the bottom two corners using a couple of stitches or a stapler on each corner to avoid any leakage. Turn it right-side-out.
- Fold the upper end of the opening inward for a distance of 1 cm and sew/staple neatly to avoid fraying. Also, narrowing of the opening makes it easier to hold seeds.
- Pass a wooden skewer horizontally through the denim at a height of 2 cm from the opening. This is the perch.
- Put a rope through the belt loop on the upper portion of the pocket and tie a knot, making sure to form a hanging loop. As an alternative method, put a carabiner through the belt loop and make sure you can easily take it off and hang it up.
- Stuff the pocket with about two-thirds of birdseed (use mixed birdseed or millet, as they will settle nicely inside the pocket).
- You do the hanging either by putting it on a fence post, tree branch, or a garden hook. It performs surprisingly well with rain but you should bring it down during strong rain.
Tip: You could cut out both back pockets and use them together as a hanging pair. This way you give more birds time to feed simultaneously.
How to place Your Bird Feeder
Where and how you place your bird feeder is the key to success, often forgotten by many bird guidebooks, but one which can transform your backyard into a hot spot for local birds.
Design your bird feeder according to its location. For instance, the Denim Pocket Pouch and Wine Cork Raft are light-weight feeders that swing easily from the wind, and you should place them in protected areas like between buildings or beneath large canopies of trees.
The heavier feeders, like the Colander Café and Teacup Diner, are much more suited for open areas, making great additions to your garden décor.
Use your backyard fences. Placing a bird feeder at the middle of your backyard fence instead of positioning it near the ends will allow the bird to see in several directions. This way you make the birds feel comfortable.
Rotate positions frequently: Predators such as cats and sparrow hawks learn the location of the feeder and start patrolling these areas regularly.
This means that relocating the feeders regularly can throw them off. And the good thing is that you don’t have to move the feeders several yards away.
Relocating the feeders only by several meters destroys such habits, making birds’ visits more surprising and less predictable to any ambushers.
Think about your neighbor. If you have a birdbath, fruiting trees, or flowering plants in your garden, place your bird feeder near these spots.
Birds who regularly visit these places will naturally notice the presence of the feeder and explore it.
This is how you can create your own backyard oasis, a place where all the sources of water and food for birds gather, and become more popular over time.
Make your feeder vertical. In case you don’t have much space for installing several feeders, hang them at various heights using the same hanger.
Some species are fond of feeding at the top while others prefer to do it at the bottom. This means that by using the vertical feeder, you will attract significantly more birds, and this is what you want, right?
FAQs
Can you paint or decorate the bird feeder with food coloring?
Yes, you can do it but only externally, using non-toxic, water-based paints and allowing sufficient time for curing prior to hanging up.
Do not use paint or food color on any surfaces where seed or birds may come in contact.
My feeder keeps spinning when the wind blows. How do I stabilize it?
You can add a weight, such as a stone or metal washer.
In particular, adding a second cord to the bottom of the feeders, such as the Colander Café or Teacup Diner, and tying it loosely around a nearby tree limb provides just enough resistance to prevent spinning but allows bird activity to occur naturally.
How do I prevent ants from getting into my bird feeder?
Simply apply some petroleum jelly on the hanging string/wire, at least 10 cm from the bird feeder. Ants will not be able to go past it.
Repeat after two weeks or during and after rains. Do not use any other ant repellents that might harm birds in your bird feeder.
Will my homemade bird feeder lure rats?
Yes, only if the birdseed spills from the bird feeder onto the ground and forms a heap. To avoid this, have a tray or some bark beneath it.
This will help in collecting the spilled seed. You also should avoid overfilling bird feeders, which may lead to seed wastage.
Should I have separate bird feeders according to different seasons?
Generally speaking, yes. During hot and dry months, feeders with open tops such as Colander Café and Teacup Diner are recommended as air flow helps keep the seed dry.
On the other hand, during wet months, enclosed or deep types of feeders such as the Denim Pocket Pouch are more suitable as they provide protection against rainfall.
During extremely cold temperatures, consider feeders containing high-calorie foods. In such a situation go for the Wine Cork Raft, which is a combination of seed and fats.
Can I have several bird feeders near each other?
Sure, but you have to space them out with at least one meter between.
Since birds are territorial regarding their feeding sites, crowding feeders too close to one another stresses the birds and may cause territorial fights. And you don’t want this, do you?
What should I do with the feeder during my holiday season?
Rather than keeping it empty when you are in holiday, it’s better to remove it completely.
If the birds continue visiting it and they find no food, they may end up getting discouraged and never come back.
If you want to keep the feeder in place and you have good neighbors, you can ask them to fill it with food every second day or just set it up again on your return, as it won’t be long before the birds discover it again.
Can I build a feeder along with my children?
Of course, but with one important thing to note.
Make sure to let all the glue and paint used to set properly by letting it cure for about 48 hours before hanging it outdoors.
Both glue and paint emit hazardous gases which could be dangerous within an enclosed space, but once cured, they’re pretty much harmless.
The Wine Cork Raft and CD Spiral Tower are perfect for kids’ projects.
Final thoughts
Making a bird feeder using reclaimed materials is perhaps one of those few activities where the work is small, and yet the pay-off is huge.
Apart from the satisfaction gained by doing this, there is also a sense of fulfillment because it closes the recycling loop for items such as your old CD cases, worn-out denim jeans, broken ceramic cups, and empty wine corks that would otherwise have ended up being thrown away and sometimes clogging the sewer lines.
Begin with just one idea today.
You do not necessarily have to try all five.
Find the one that suits the supplies you currently have, use twenty minutes to construct it, and then put it up somewhere you will see it each day.
And observe what happens next.
Related Posts: